Difference between revisions of "Actuators"
(→Haptic System Actuators) |
(→Transistors) |
||
| (16 intermediate revisions by one other user not shown) | |||
| Line 1: | Line 1: | ||
by Edgar Berdahl | by Edgar Berdahl | ||
| + | (modified by Wendy Ju) | ||
We can affect the world directly by using actuators. Some extra parts are involved because actuators generally require that relatively large currents flow through them in order to provide relatively large forces. The signal flow diagram including a force signal generator, power amplifier, and actuator is shown below. | We can affect the world directly by using actuators. Some extra parts are involved because actuators generally require that relatively large currents flow through them in order to provide relatively large forces. The signal flow diagram including a force signal generator, power amplifier, and actuator is shown below. | ||
| Line 107: | Line 108: | ||
[[Image:servo1.jpg]] | [[Image:servo1.jpg]] | ||
</center> | </center> | ||
| + | |||
| + | The control a motor in both directions from an Arduino, we use an H-bridge. | ||
| + | |||
| + | [[Image:H-bridge4.gif]] | ||
| + | |||
| + | By turning on the upper left and lower right transistor, we can get the motor to turn in one direction; by using the upper right and lower left, we can get the motors to turn in the other direction. | ||
===== Vibrating Motor ===== | ===== Vibrating Motor ===== | ||
| Line 124: | Line 131: | ||
<br> | <br> | ||
| + | ==== Other actuators ==== | ||
| + | |||
| + | Other actuators include clutches, and hydraulic devices | ||
| Line 146: | Line 156: | ||
See the [http://cm-wiki.stanford.edu/wiki/MaxLab#Supplies MAXLAB wiki page] for ideas on where to get parts for actuation. | See the [http://cm-wiki.stanford.edu/wiki/MaxLab#Supplies MAXLAB wiki page] for ideas on where to get parts for actuation. | ||
| + | == Transistors == | ||
| + | |||
| + | To power actuators, we often need more current or different voltages than can be supplied from the Arduino. Hence, we use transistors. | ||
| + | |||
| + | A transistor controls current through the voltage at its base. | ||
| + | |||
| + | This image shows a hydraulic analogy for a BJT transitor: | ||
| + | [[Image:transistor1.jpg]] | ||
| + | |||
| + | PNP: Pointing in Proudly: | ||
| + | [[Image:transistor3.jpg]] | ||
| + | |||
| + | |||
| + | If base is at lower voltage than emitter, current flows from E to C | ||
| + | |||
| + | Small amount of current flows from E to B. | ||
| + | |||
| + | NPN: Not Pointing in: | ||
| + | |||
| + | [[Image:transistor2.jpg]] | ||
| + | |||
| + | If base is a higher voltage than emitter, current flows from C to E | ||
| + | |||
| + | Small amount of current flows from B to E | ||
| + | |||
| + | How to use transistors: | ||
| + | [[Image:transistor_circuit1.jpg]] | ||
| + | |||
| + | [[Image:transistor_circuit2.jpg]] | ||
[[Category:PID]][[Category:PID_2007]] | [[Category:PID]][[Category:PID_2007]] | ||
| + | |||
| + | ===Darlington transistors=== | ||
| + | |||
| + | [[Image:darlington.jpg]] | ||
| + | |||
| + | Darlington transistors allow higher gain, but are a little slow. Common darlingtons are ULN 2003 for use for incandescent lamps, relays, printer hammers, etc. | ||
| + | |||
| + | TIP120 for motors, lamps | ||
| + | |||
| + | How to use: | ||
| + | |||
| + | [[Image:darlington_circuit1.jpg]] | ||
| + | |||
| + | [[Image:darlington_circuit2.jpg]] | ||
| + | |||
| + | === MOSFETS === | ||
| + | |||
| + | Here is the hydraulic analogy for n-channel MOSFETs. | ||
| + | |||
| + | [[Image:hydraulic_mosfet.jpg]] | ||
| + | |||
| + | Gate, Drain and Source are analogous to Base, Collector and Emitter. | ||
| + | |||
| + | No current flows from Gate to Source/Drain | ||
| + | |||
| + | [[Image:mosfet.jpg]] | ||
| + | |||
| + | A Common N-Channel MOSFET is an IRF510. It has faster turn off and higher max currents than BJTs, but requires higher gate voltages. | ||
| + | |||
| + | [[Image:mosfet_circuit.jpg]] | ||
Latest revision as of 09:11, 24 October 2011
by Edgar Berdahl (modified by Wendy Ju)
We can affect the world directly by using actuators. Some extra parts are involved because actuators generally require that relatively large currents flow through them in order to provide relatively large forces. The signal flow diagram including a force signal generator, power amplifier, and actuator is shown below.
Acoustic System Actuators
Often we would like to induce vibrations spanning the entire range of human hearing. Here we explain how to induce these vibrations in air and in structures. Here is one particularly small but powerful audio power amplifier.
Vibrations in Air
Loudspeaker Driver
Loudspeaker drivers convert an electrical signal into pressure waves in air. These are quite common, so we refer the reader to Hyperphysics and Wikipedia. Since loudspeaker drivers are usually linear actuators, their maximum displacement is usually limited.
Vibrations in Structures
Lorentz Force Actuator
The Lorentz force is the force on an electrical current carrier in the presence of a magnetic field. Any element can be actuated according to the Lorentz force if an electrical current can be passed along it.
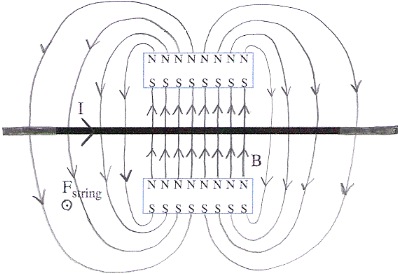
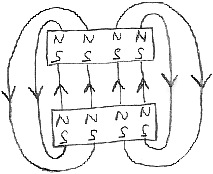
We present the example of actuating a vibrating string. An electrically conductive vibrating string is placed between two permanent magnets. Notice that the field flowing from the north pole of the upper magnet to the south pole of the lower magnet is much less focused.
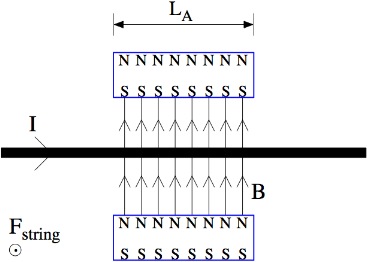
For simplicity of analysis, we assume that the magnetic field B is completely uniform in between the magnets. Since the field flowing back is so much less focused, we also assume that it never flows back to complete the magnetic circuit:
Then the force on the string is F= LAI × B
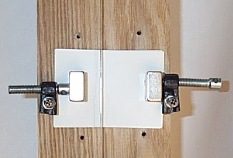
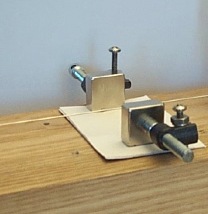
A piece of wire of only about 1m in length has a relatively low resistance. In order to connect it to the output of a typical audio power amplifier, it must be placed in series with power resistors to avoid overloading the audio amplifier’s output. The next two figures show a realization in the laboratory.
The other electrodynamic actuators described here such as woofers, shakers, servomotors, solenoids, etc. operate according to this principle.
Electromagnet Actuator
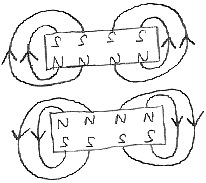
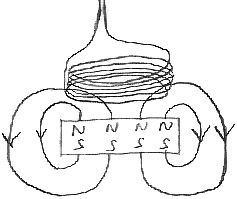
Replacing one of the permanent magnets with an electromagnet. The direction of the current through the coil determines whether the two magnets attract or repell one another:
What if you want to actuate something that isn't a magnet? Most efficient solution: glue a small neodymium magnet to the object that is to be actuated. Alternate solution: if the object is ferrous (magnetically "sticky" aka magnetizable such as iron or steel), then the object to be actuated can be magnetized by placing it in the neighborhood of a magnet. The E-Bow and the Sustainiac use this principle to actuate guitar strings.
See the Electromagnetically-Prepared Piano Project for details on how to actuate piano strings. The parts are listed here.
Piezoelectric Actuators
from Wikipedia:
As very high electric fields correspond to only tiny changes in the width of the crystal,
this width can be changed with better-than-micrometer precision, making piezo crystals the
most important tool for positioning objects with extreme accuracy — thus their use in actuators.
Multilayer ceramics, using layers thinner than 100 microns, allow reaching high electric fields
with voltage lower than 150 V. These ceramics are used within two kinds of actuators: direct
piezo actuators and Amplified Piezoelectric Actuators. While direct actuator's stroke is
generally lower than 100 microns, amplified piezo actuators can reach millimeter strokes.
* Loudspeakers: Voltage is converted to mechanical movement of a piezoelectric polymer film.
* Piezoelectric motors: piezoelectric elements apply a directional force to an axle, causing it to
 rotate. Due to the extremely small distances involved, the piezo motor is viewed as a high-precision
 replacement for the stepper motor.
* Atomic force microscopes and scanning tunneling microscopes employ converse piezoelectricity to keep
the sensing needle close to the probe.
* Inkjet printers: On many inkjet printers, piezoelectric crystals are used to drive the ejection of
ink from the inkjet print head towards the paper.
Haptic System Actuators
If it is sufficient to induce slower vibrations at relatively lower frequencies, for instance for interfacing with the human motor system, then we can use more conventional actuators.
DC motors
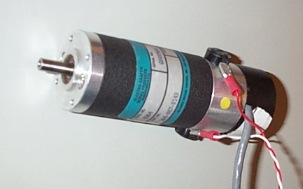
Since linear motors support only limited displacements, it is often more convenient to use rotational motors. If the motor is a DC motor, then the torque (rotational force) it exerts is proportional to the electrical current flowing through it. The direction of current through the motor determines the rotational direction of the motor: clockwise or counter clockwise. Sometimes DC motors have rotary encoders built in so that they can sense the rotational angle of the shaft.
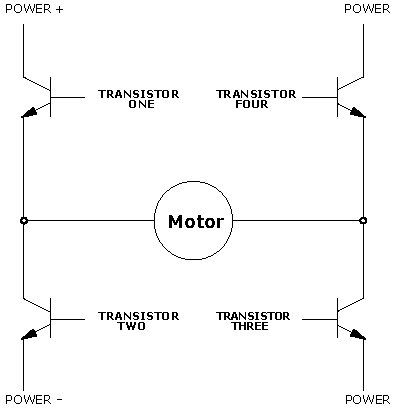
The control a motor in both directions from an Arduino, we use an H-bridge.
By turning on the upper left and lower right transistor, we can get the motor to turn in one direction; by using the upper right and lower left, we can get the motors to turn in the other direction.
Vibrating Motor
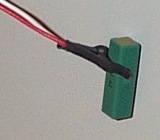
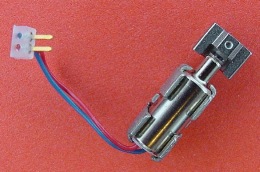
The vibrating motor below has a weight asymmetrically attached to the shaft so that it vibrates when the shaft rotates. Similar motors are present in cell phones.
Servo motors
See this page
Solenoids
Ajay Kapur's MahaDeviBot uses solenoids to actuate drums.
Other actuators
Other actuators include clutches, and hydraulic devices
Controlling With the Arduino
The Pulse Width Modulation (PWM) output of the AVR can serve as the force signal generator.
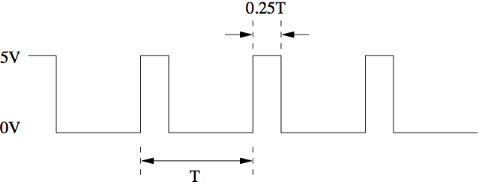
Pulse Width Modulation (PWM) is a technique that we use to control the speed of the motor. A DC motor's speed is determined by now much current is flowing through it. Intuitively, if we supply a low DC current, the motor will spin slowly. It will spin more quickly with a higher current. As it turns out, it is difficult to create a circuit that supplies a varying current like this. So, we use PWM. Pulse Width Modulation used two discrete values of current (none and full) in pulses that average to the desired current value you need to make the motor act as you want. The longer the pulse, more average current flows through the motor, and the faster it goes. We speak of the length of the pulse in terms of something called the Duty Cycle. For example, in the figure below, the duty cycle is 25%.
PWM can be used to control the apparent output intensity of LED's, too!
See the MAXLAB wiki page for ideas on where to get parts for actuation.
Transistors
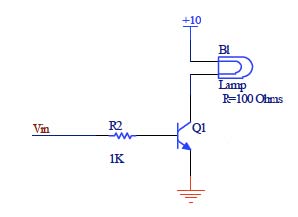
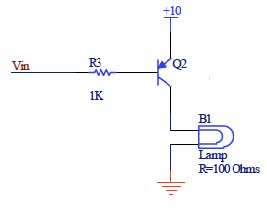
To power actuators, we often need more current or different voltages than can be supplied from the Arduino. Hence, we use transistors.
A transistor controls current through the voltage at its base.
This image shows a hydraulic analogy for a BJT transitor:
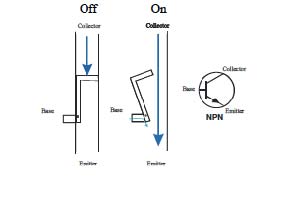
If base is at lower voltage than emitter, current flows from E to C
Small amount of current flows from E to B.
NPN: Not Pointing in:
If base is a higher voltage than emitter, current flows from C to E
Small amount of current flows from B to E
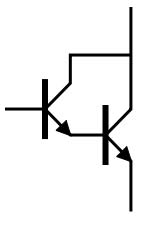
Darlington transistors
Darlington transistors allow higher gain, but are a little slow. Common darlingtons are ULN 2003 for use for incandescent lamps, relays, printer hammers, etc.
TIP120 for motors, lamps
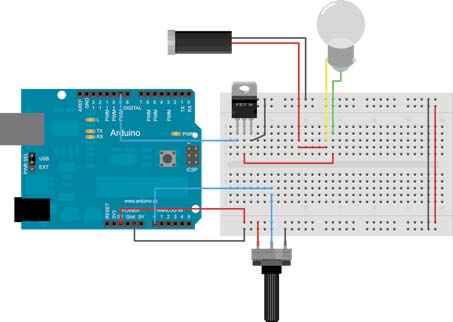
How to use:
MOSFETS
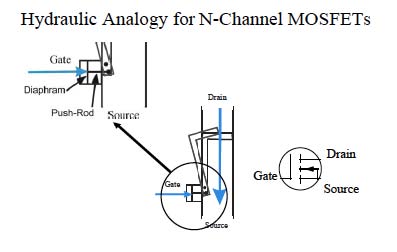
Here is the hydraulic analogy for n-channel MOSFETs.
Gate, Drain and Source are analogous to Base, Collector and Emitter.
No current flows from Gate to Source/Drain
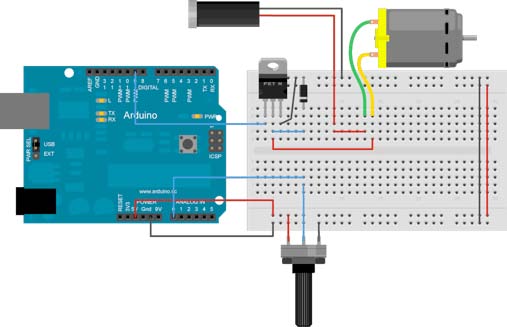
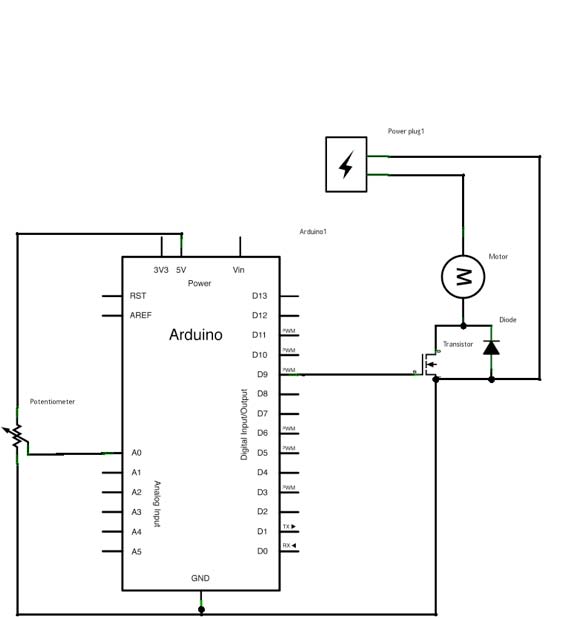
A Common N-Channel MOSFET is an IRF510. It has faster turn off and higher max currents than BJTs, but requires higher gate voltages.

