Difference between revisions of "250a Homemade Digital Musical Instrument"
(→Wire Up Some Switches To Your Board) |
m (→Wire Up Some Switches To Your Board) |
||
| Line 60: | Line 60: | ||
[[Image: Fourswitches.jpg]] | [[Image: Fourswitches.jpg]] | ||
| + | |||
| + | Open up the file ''arduino-test.pd'' in Pd to check that the switches work. You will have to go into the subpatch | ||
| + | '''pd old analog/digital controls''' in order to enable ananlog inputs A2-A5. (We could have used digital inputs instead since we only care if the switches are on or off, but the wiring was more convenient this way.) | ||
| + | |||
<center>[[250a 2010]]</center> | <center>[[250a 2010]]</center> | ||
[[Category:250a]][[Category:PID]] | [[Category:250a]][[Category:PID]] | ||
Revision as of 17:29, 16 April 2010
Homemade Digital Musical Instrument
Demo at the 159th Meeting of the Acoustical Society of America
For the Session Homemade Musical Instruments for Teaching Acoustics
Contents
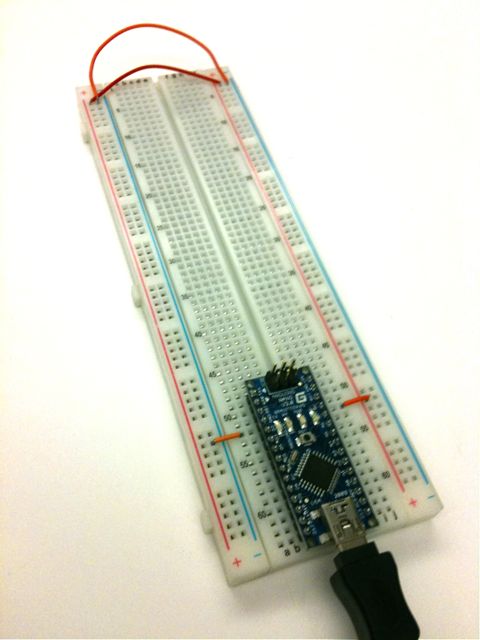
Mount your Arduino Nano on your breadboard
We will be powering the Nano and the breadboard with current from the USB port, which is good for up to 500mA of 5 V±5%-- probably enough for most input circuits, although not enough if you plan to run a lot of LEDs or motors.
- The Nano should sit at the bottom of the breadboard, so that the pins lie in rows 49-64 on either side.
- Using jumper wires, connect the row 52 pin (GND) on the left side of the Nano to the blue ground (GND) rail.
- Connect the row 52 pin (+5V) on the right side of the Nano to the red Power rail.
- Use jumper wires to connect the power and GND rails on the left side of the breadboard to the right.
Install Firmata onto your Arduino Nano
- Install the Arduino software
- Unarchive the file, and move it to your applications folder.
- Install the FTDI driver that comes with the Arduino software so that your computer will recognize the Arduino when it is plugged into the USB port.
- Open the Arduino software.
- Download the newest version of Pduino, unarchive it, and use the Arduino software program to open StandardFirmata.pde, which lies inside the folder Firmata-2.1:Firmata:examples:StandardFirmata.
- Connect your Arduino Nano to your computer using a USB cable.
- Use Tools->Board and Tools->Serial Port to select the Arduino Nano (Atmega 328) and USBserial tty port, then hit the Play button to verify and compile the program.
- Upload the Firmata firmware to your Arduino Nano using upload button, the fourth square button from the left (the one with the sideways arrow).
- Close the Arduino program. (This is important because it frees up the USB serial port so that Max/MSP or PD can talk to the Arduino board next.)
Install Pure Data Onto Your Computer
Install Pure Data Extended onto your computer.
- Do NOT install the vanilla version of Pd!
- Mess around with Pd a little bit to get a feel for it. Go through some of the tutorials in the Help|Brower menu.
- In order to use the bowed string instrument synthesizer called Bowed~, you will need to install Stk2pd, which ports the Synthesis Toolkit to Pd.
- Search your hard disk for the file Bowed~-help.pd and open it. See what it is like to employ a physical model to synthesize sound.
Wire Up Some Switches To Your Board
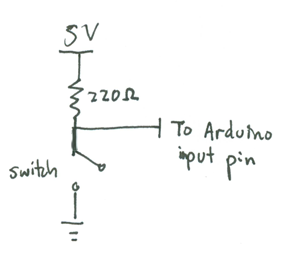
Here is the schematic for each switch. Closing the switch pulls the input to the Arduino to 0V; otherwise, if the switch is open, the voltage is about 5V.
Take each of the switches that you see here,
and cut off the extra lead as shown to make it easier to mount into the protoboard.
Wire up the first switch as shown below with the middle pin placed in row 42 and the end pin in row 41:
Connect a 220 Ohm (red-red-brown) resistor between row 42 and the supply voltage 5V (the red rail). Also connect row 42 to row 58, which connects to pin A2 of the Arduino. Finally connect row 41 to ground (0V).
Connect up the other switches in the same fashion to the analog input pins A3, A4, and A5 of the Arduino:
Open up the file arduino-test.pd in Pd to check that the switches work. You will have to go into the subpatch pd old analog/digital controls in order to enable ananlog inputs A2-A5. (We could have used digital inputs instead since we only care if the switches are on or off, but the wiring was more convenient this way.)


