Difference between revisions of "Tangible Embedded Linux"

From CCRMA Wiki
Jump to: navigation, search
(Epilogue II. End Of Workshop)
 
(40 intermediate revisions by the same user not shown)
Line 1: Line 1:
<font size=5>Lab 1: Intro to Satellite CCRMA and Making Music with Pd </font><br>
+
These instructions have most recently been heavily edited by [https://ccrma.stanford.edu/~eberdahl Edgar Berdahl]
See [https://ccrma.stanford.edu/courses/250a/schedule.html this quarter's schedule] for due dates.
+
  
See the instructions on [https://ccrma.stanford.edu/courses/250a/labs/ https://ccrma.stanford.edu/courses/250a/labs/] for how to submit the lab! For this lab you need your [http://ccrma.stanford.edu/~eberdahl/Satellite Satellite CCRMA kit], a computer to program it, and some headphones with a mini 1/8" stereo jack.
+
(Some portions of the teaching materials may have been contributed by other authors such as Wendy Ju, Bill Verplank, Michael Gurevich, Spencer Salazar, Matt Wright, etc.)


== The Satellite CCRMA Setup ==
+
This workshop consists of a condensed version of the material from labs 1 and 2 for the course [http://ccrma.stanford.edu/courses/250a Music 250A] at Stanford University. For this workshop you need your [http://ccrma.stanford.edu/~eberdahl/Satellite Satellite CCRMA kit], a laptop computer with Ethernet adaptor to program it, and some headphones with a mini 1/8" (2.54mm) stereo jack.
Included in your kit you should have
+
- Satellite CCRMA Hardware (Beagle Board + microSDHC memory card + Arduino Nano + solderless breadboard)
+
- One 5V power adaptor to plug into the Beagle Board
+
- One Ethernet cable for external communication
+
- Arduino Nano
+
- One adjustable-length USB cable
+
  
If you are missing something, please go get it before assembling your kit. Make sure you plug the micro SDHC memory card fully into its seat so that it looks as shown inside the red box:
+
You are also invited to bring the following optional items, but they are by no means required:
 +
* Some of your favorite breadboardable sensors and LEDs.
 +
* A set of small, battery powered speakers with 1/8" (2.54mm) jack.
 +
* A pico projector with cable to HDMI connector.
  
[[Image:Kitblank.jpg]]
+
Prior to coming to the workshop, you may wish to read more about [https://ccrma.stanford.edu/satellite Satellite CCRMA], [http://puredata.info Pure Data], [http://www.raspberrypi.org Raspberry Pi], or the [http://arduino.cc/en/Main/ArduinoBoardNano Arduino Nano].


+
== Introductions ==
 
+
* Participants explain their backgrounds and what they would like to get out of the workshop.
== Powering Up For The First Time ==
+
* Show some videos of prior projects
Plug the Ethernet port of the Satellite CCRMA into your laptop. Then plug in the 5V power supply into the Beagle as shown below. You should see some lights turn on, flickering every now and then. This means that Satellite CCRMA is booting up.
+
* Construct Satellite CCRMA kits
 
+
[[Image:Kitplugged.jpg]]
+
 
+
 
+
 
+
 
+
== Connect To Satellite CCRMA ==
+
In order to see what your Satellite CCRMA kit is doing and program it, you need to log in to it. To do so, follow [https://ccrma.stanford.edu/wiki/CCRMA_Satellite_How_To_Connect_RevC these instructions].
+
 
+
After you login, you will see the prompt ''ccrma@satellite:~$''  This means that you are logged into a computer named "satellite" as the user "ccrma", and you are currently in the directory ~, which is the shortcut for your home directory.
+
 
+
 
+
 
+
 
+
== Avoid Powering Down the Board Without Halting it First! ==
+
Would you take the battery out of your laptop and unplug its power adaptor without shutting down? ''I don't think so!'' The same goes for Satellite CCRMA, at least when you can avoid it, because it is a small computer running linux.
+
 
+
Now we will test the halt procedure. Run the halt command as superuser by typing ''sudo halt'' at the Satellite CCRMA prompt. Then you will again have to type in the password ''temppwd'' in order to have the privilege to run this command. Wait until about 15 seconds after you see the message "Connection to 192.168.105.106 closed by remote host," and then disconnect the 5V power adaptor from the Beagle Board.
+
 
+
== Getting Comfortable With Satellite CCRMA ==
+
* Turn on Satellite CCRMA again using the same procedure as before where you plug the power into the Beagle Board. After about 30 seconds, the board should be booted up again, so you can log in again by running the command
+
 
+
''ssh -XY ccrma@192.168.105.106''
+
 
+
* Run the command ''pwd'' to find out the current directory. You will find that you are in the ''ccrma'' subdirectory of the directory ''/home''.
+
 
+
* Type the ''ls'' command to see what is in the current directory. The blue items are subdirectories of the current directory. You can change directories using the ''cd'' command. For instance, to change into the ''pd/pd-lecture'' subdirectory, you should run the command
+
 
+
''cd pd/pd-lecture''
+
 
+
* Now again type ''pwd'' to make sure that you understand where you are! Run the ''ls'' command to see what files are in here.
+
 
+
* Find out if you have successfully connected Satellite CCRMA to the Internet by running the command
+
 
+
''ping yahoo.com''
+
 
+
* If you get responses that take about 100 ms to 200 ms, then your settings are correct. This probably won't work if you are running Mac OS X 10.7 (Lion) or Mac OS X 10.8 (Mountain Lion), as Internet Sharing is unreliable on these systems.
+
 
+
== Starting Audio And Pd ==
+
 
+
* First we need to start up the audio connection kit. It's easiest to do so using the graphical interface, so execute the command
+
 
+
''qjackctl &''
+
 
+
The ampersand (&) is there to indicate that even though you are opening a new window, you should still be able to keep typing at the old terminal. There might be some strange error message windows, but just close these to get back to the main JACK Audio Connection Kit. To start audio, click on the ''Start'' button.
+
 
+
* In order to be able to hear audio, you will need to plug a pair of ear buds, headphones, or loudspeakers into the 1/8" (2.54mm) jack labeled AUDIO OUT on the Beagle Board. '''Be very careful when plugging the headphones in and not to pull too hard on the headphone cable! Unfortunately it comes off of the board very easily, that is you can break the board this way!!!'''
+
 
+
* Start pd now with the following command, where again we include &:
+
 
+
''pd &''
+
 
+
* Choose ''Open'' from the ''File'' menu and select the patch ''4_algorithmic_music.pd''. In the main ''pd-extended'' window, click on the ''compute audio'' button. Then go back to the patch, move the speed and width sliders slightly to the right, and bring up the volume. You should now hear some sound in your headphones. Play around with the parameters to see what new sounds you can discover.
+
 
+
Troubleshooting: If you still do not here any sound, then probably you missed one of the steps so far. If you look at the messages in the main ''pd'' window, you might find a clue.
+
 
+
 
+
 
+
 
+
== Accessing the Lab Patches==
+
 
+
* Now go back to the terminal again, and run ''pwd'' to remind yourself that you are in ''/home/ccrma/pd/pd-lecture''. Run the command
+
 
+
''cd ..''
+
 
+
(yes with two periods!) to go up one directory level. Run ''pwd'' again to check that you are now in ''/home/ccrma''.
+
 
+
* You used to have to download a zip-file of all of the PD patches and sound files used in this lab. Now, these are instead installed on the Satellite CCRMA kit by default. Type:
+
 
+
''cd labs-Music-250a-2011/lab1''
+
 
+
and hit enter to change to the Lab 1 directory. If you run ''ls'' you will see a variety of PD patches and some sound files.
+
 
+
== Play Around With the Patches ==
+
 
+
* Go back to ''pd'' and open the patch labeled ''myinstrument.pd'' inside ''labs-Music-250a-2011/lab1''. Make sure that ''compute audio'' is set to on and ''qjackctl'' is still open and running. Play around with the patch. You should be able to exhaust its musical potential in a matter of minutes; reflect on its strengths and limitations.
+
 
+
* Also try to understand how it works as a piece of software. (But please don't get hung up on the arcana - as always, if you get stuck, ask for help rather than waste time.)
+
 
+
==Documentation==
+
 
+
* Right-click or option-click on any object to get a contextual menu including "help," which opens that object's help patch. (If you are using a Mac and don't have a right mouse button, then go to the ''X11'' pull-down menu, select ''Preferences'', and make sure that ''Emulate three button mouse'' is checked in the ''Input'' pane. Now, you should be able to right-click by clicking while holding down the Command key.)
+
 
+
* Right-click on a blank portion of a Pd patch. Now when you select "help" you get a list of Pd's built-in objects, arranged by category.
+
 
+
* In the upper right hand corner of each Pd window is a "help" menu. This accesses the Pd tutorials as well as some online reference documentation.
+
 
+
 
+
 
+
==Short questions==
+
Why is the following patch a bad idea?
+
 
+
[[Image:badidea.gif]]
+
 
+
Make a patch that shows how to connect some objects together to calculate the function ''1-x'' where ''x'' is an input number.  Save the patch in a file called ''OneMinus''.
+
 
+
 
+
 
+
 
+
== Design a different musical interaction ==
+
 
+
Here are some ideas of changes that might make the patch more interesting:
+
 
+
* Involve more QWERTY keys
+
* Involve the mouse (see the [MouseState] object)
+
* Load in a larger collection of samples.
+
** Implement a mechanism to switch among banks of samples
+
* Multiple gestures to one result: design a way for the parameters of each triggered note to depend on multiple key presses. For example, maybe only the space bar triggers notes, and all the other keys determine parameters of notes.
+
** Make your patch automatically generate a bassline as a function of the key presses
+
** Set multiple parameters modally, as volume works in the sample patch
+
** Use chording: keep track of all the keys that are currently pressed, and use only that information to set the parameters for each note.
+
* One gesture to multiple results
+
** Use the "metro" object to trigger a steady stream of notes. Now you have two new parameters: repetition rate, and whether the metro is on or off.
+
** Use the "counter" object to step through a cycle (of samples, parameter settings, etc.)
+
** You could combine "metro" and "counter" to build a rudimentary sequencer that can step through a rhythmic pattern
+
** Invent a mechanism to record short sequences of keypresses and play them back in time.
+
* Incorporate looping or other interactive controls over the soundfile playback
+
* Use Pd's "spigot" object to route control information to different parts of your patch at different times
+
* Polyphony: make it so the patch can play multiple samples at the same time. (Hint: put multiple copies of "play-sample" in your patch)
+
* Use a totally different form of sound synthesis, such as FM, granular, or physical modeling.
+
 
+
We recommend that you pick '''only one or a small number''' of these and work on it in depth, iterating on both the program/test/debug cycle as well as the design/implement/play cycle to craft something that has actual musical potential or is at least more fun to play. If you have an existing idea for your class project, you could use this lab to start thinking about implementing some of the modes and mappings. By all means, if you're inspired to try something else, go for it. If you'd rather spend today getting more of a broad sense of Pd's capabilities, feel free to work on many of these suggestions.
+
 
+
 
+
 
+
 
+
== The Community ==
+
 
+
There is a large, dedicated, and very generous community of Pd users on the Internet. Do some web searching (e.g., with a search engine, or else starting from some more specific resources) and look for interesting externals and/or patches. '''Optional:''' Download, install, and play with at least one. Can you incorporate it into what you programmed in the previous part?
+
 
+
For more help in finding resources, don't forget to look on the [[PID Links]] page.
+
 
+
 
+
 
+
 
+
== Appendix: Troubleshooting ==
+
Tips:
+
* Type <tt>dmesg</tt> to see if there are any relevant messages that look like error messages.
+
* Check if the Jack audio server has crashed. If so, then restart it.
+
 
+
Solutions:
+
* If you are running out of space on the SD card, you can free up some space by deleting items in <tt>/usr/src</tt>. For instance, all of the files needed for building Pure Data Extended are rather large.
+
* If you are unable to access the internet from Satellite CCRMA, and you are not at CCRMA, then you may need to change the DNS nameserver specified in <tt>/etc/resolv.conf</tt> You could do this using the <tt>set-DNS-server</tt> command.
+
 
+
 
+
 
+
 
+
== Optional: Programming Linux ==
+
'''We don't actually expect you to do anything here, we are just providing some more information that is maybe helpful for you linux gurus.''' Since ccrma@satellite runs ubuntu linux on an OMAP chip, many standard software packages have been compiled for it. This is why we were easily able to install software such as Jack, [http://audacity.sourceforge.net/ Audacity], [http://chuck.cs.princeton.edu/ ChucK], [http://faust.grame.fr/ Faust], [https://ccrma.stanford.edu/groups/soundwire/software/jacktrip/ Jacktrip], and the Arduino software.
+
 
+
If you are lucky, you can install your favorite software using the ''apt-get'' utility. To get a list of packages available on the OMAP's ARM architecture, type
+
 
+
''sudo apt-cache pkgnames''
+
 
+
You will notice that this list is way too long to look at. You can pipe it to the text file using the command
+
 
+
''sudo apt-cache pkgnames > packages.txt''
+
 
+
and then look at it using ''emacs packages.txt'', or you search for a particular package, such as
+
 
+
''sudo apt-cache pkgnames | grep emacs''.
+
 
+
Or, you can compile linux software yourself on the Beagleboard. The gcc, g++ tools etc. are already installed.
+
 
+
Type the ''df'' command. You can see that there is not a whole lot more than 1GB available on the SD card, so you should only install software if you decide that you need it.
+
 
+
 
+
 
+
 
+
== Halt Your Board Properly When Finished! ==
+
'''Remember to shut down your board when you are done before powering it off!''' (Of course, if you are operating ''truly'' autonomously, of course you cannot login and run the halt command. Nevertheless, if it is not too inconvenient please try to shut down properly if you can. If you do not, then you may find that your memory card becomes corrupted.)
+
 
+
== Submit The Lab ==
+
See the instructions on [https://ccrma.stanford.edu/courses/250a/labs/ https://ccrma.stanford.edu/courses/250a/labs/] for how to submit the lab! 
+
 
+
* If you need help getting files off of your kit onto your laptop, you can use the ''scp'' command.  For instance, to copy the file examplepatch.pd from the directory ~/pd/labs-Music-250a-2011/lab1/ on your kit, to the current directory on your laptop, you can run the command
+
 
+
''scp ccrma@192.168.105.106:~/pd/labs-Music-250a-2011/lab1/examplepatch.pd .''
+
 
+
in a separate Terminal window on your laptop.  The period means "the current directory."
+
 
+
* Alternatively, if you would like to use software with a nice GUI for copying files back and forth from your kit, you can install additional special software on your laptop.  For Windows, install [https://itservices.stanford.edu/service/ess/pc/securefx Secure FX], or for Mac OS X, install [https://itservices.stanford.edu/service/ess/mac/fetch Fetch].  These programs actually use scp, but they hide the details of the pathnames from you.
+
 
+
== More Pd resources ==
+
* Here are some lists of pd objects that you can use to discover new object names: [http://protman.com/content/list-puredata-objects-and-extended-objects http://protman.com/content/list-puredata-objects-and-extended-objects] [http://www.umatic.nl/workshop/objects.txt http://www.umatic.nl/workshop/objects.txt]
+
 
+
 
+
 
+
<center>[[PID 2013]]</center>
+
[[Category:PID_2013]][[Category:PID]]
+
 
+
 
+
 
+
 
+
 
+
 
+
 
+
<font size=5>Lab 1: Making Music with Pd in Satellite CCRMA</font><br>
+
Lab write-up due on Tuesday at 10AM
+
 
+
Most instructions by Edgar Berdahl, and lab patches for musical interaction description by Matt Wright and possibly others
+
 
+
For this lab you need your [http://ccrma.stanford.edu/~eberdahl/Satellite Satellite CCRMA kit], a computer to program it, and some headphones with a mini 1/8" stereo jack.
+
 
+
 
+
 
+
== The Satellite CCRMA Setup ==
+
Included in your kit you should have
+
- Satellite CCRMA Hardware (Beagle Board + microSDHC memory card + Arduino Nano + solderless breadboard)
+
- One 5V power adaptor to plug into the Beagle Board
+
- One Ethernet cable for external communication
+
- Arduino Nano
+
- One adjustable-length USB cable
+
 
+
If you are missing something, please go get it before assembling your kit. Make sure you plug the micro SDHC memory card fully into its seat so that it looks as shown inside the red box:
+
 
+
[[Image:Kitblank.jpg]]
+
  
  
Line 245: Line 24:
  
 
== Powering Up For The First Time ==
 
== Powering Up For The First Time ==
Plug the Ethernet port of the Satellite CCRMA into your laptop. Then plug in the 5V power supply into the Beagle as shown below. You should see some lights turn on, flickering every now and then. This means that Satellite CCRMA is booting up.
+
Plug the Ethernet port of the Satellite CCRMA into your laptop. Then use the provided power adaptor to power up the Raspberry Pi via the USB micro port. You should see some lights turn on, flickering every now and then. This means that Satellite CCRMA is booting up.
 
+
[[Image:Kitplugged.jpg]]
+
  
  
Line 260: Line 37:
  
  
== Avoid Powering Down the Board Without Halting it First! ==
 
Would you take the battery out of your laptop and unplug its power adaptor without shutting down? ''I don't think so!'' The same goes for Satellite CCRMA, at least when you can avoid it, because it is a small computer running linux.
 
  
Now we will test the halt procedure. Run the halt command as superuser by typing ''sudo halt'' at the Satellite CCRMA prompt. Then you will again have to type in the password ''temppwd'' in order to have the privilege to run this command. Wait until about 15 seconds after you see the message "Connection to 192.168.105.106 closed by remote host," and then disconnect the 5V power adaptor from the Beagle Board.
+
== Stop Default Patch and Run Pd ==
 +
* In order to be able to hear audio, you will need to plug a pair of ear buds, headphones, or loudspeakers into the 1/8" (2.54mm) jack labeled AUDIO OUT on the Raspberry Pi. Be careful when plugging the headphones in and not to pull too hard on the headphone cable!
  
 +
* '''A default pd patch starts running automatically when your kit finishes booting up. If your kit is configured correctly, the only evidence you will have of this is some sound in the headphones (you might have to touch the A0 pin on the Arduino with your finger to hear the sound). To stop the default patch, run the command'''
 +
''stop-default''
  
 +
When you run this command, you will observe that the sound in the headphones stops.
  
 +
'''Remember that each time you boot up your kit and want to edit your patch, you should stop the default patch from running by using the command ''stop-default'' '''
  
== Getting Comfortable With Satellite CCRMA ==
+
* Start pd now again with the following command:
* Turn on Satellite CCRMA again using the same procedure as before where you plug the power into the Beagle Board. After about 30 seconds, the board should be booted up again, so you can log in again by running the command
+
 
+
''ssh -XY ccrma@192.168.105.106''
+
 
+
* Run the command ''pwd'' to find out the current directory. You will find that you are in the ''ccrma'' subdirectory of the directory ''/home''.
+
 
+
* Type the ''ls'' command to see what is in the current directory. The blue items are subdirectories of the current directory. You can change directories using the ''cd'' command. For instance, to change into the ''pd_lecture'' subdirectory, you should run the command
+
 
+
''cd pd_lecture''
+
 
+
* Now again type ''pwd'' to make sure that you understand where you are! Run the ''ls'' command to see what files are in here.
+
 
+
* Find out if you have successfully connected Satellite CCRMA to the Internet by running the command
+
 
+
''ping yahoo.com''
+
 
+
* If you get responses that take about 100 ms to 200 ms, then your settings are correct.
+
 
+
 
+
 
+
 
+
== Starting Audio And Pd ==
+
 
+
* First we need to start up the audio connection kit. It's easiest to do so using the graphical interface, so execute the command '''start-jackd'''
+
 
+
* In order to be able to hear audio, you will need to plug a pair of ear buds, headphones, or loudspeakers into the 1/8" (2.54mm) jack labeled AUDIO OUT on the Beagle Board. '''Be very careful when plugging the headphones in and not to pull too hard on the headphone cable! Unfortunately it comes off of the board very easily, that is you can break the board this way!!!'''
+
 
+
* Start pd now with the following command, where again we include &:
+
  
 
''pd &''
 
''pd &''
  
* Choose ''Open'' from the ''File'' menu and select the patch ''4_algorithmic_music.pd''. In the main ''pd-extended'' window, click on the ''compute audio'' button. Then go back to the patch, move the speed and width sliders slightly to the right, and bring up the volume. You should now hear some sound in your headphones. Play around with the parameters to see what new sounds you can discover.
+
This time the graphical user interface (GUI) for pd should also start.
  
Troubleshooting: If you still do not here any sound, then probably you missed one of the steps so far. If you look at the messages in the main ''pd'' window, you might find a clue.
+
* To start audio, click on the ''Compute audio'' checkbox.
  
 +
* Now to test audio, go to the media pull-down menu and choose ''Test Audio and MIDI.''  If you still do not here any sound, then probably you missed one of the steps so far. If you look at the messages in the main ''pd'' window, you might find a clue.
  
 +
* Once you have audio working, close the window test audio and MIDI window.
  
  
== The Patches Are Already On The Board==
 
  
*  You can find the main patch at /home/ccrma/pd/labs-Music-250a-2011/lab1/myinstrument.pd


 +
== Learn A Little More About Pd ==
 +
If you get stuck at some point while learning about pd, remember that you can right-click on an object to get help information about the object.
 +
* The patch ''~/pd/examples/just-play-WAV-files/play-WAV-file.pd'' shows the easiest way to play a WAV file.
 +
* Look at the pd lecture patches stored in ''~/pd/pd-lecture'' (For example, see the patch ''4_algorithmic_music.pd''. Make sure that audio is on and increase the volume from zero in the patch.)
 +
* By default, the patch ''~/on-startup/default-patch.pd'' runs right when the kit finishes booting up. Open this patch manually from within pd.
 +
** Look at the left side of the patch. You will see that this patch automatically enables audio 8 seconds (i.e. 8000 milliseconds) after the patch is opened.
 +
** Now, if you touch the A0 pin or the Arduino with your hand, you should be able to hear the ''sound of a windy day.'' (If you still don't hear anything, try touching a grounded object with your other hand.)
 +
** The patch works by filtering white noise (from ''noise~'') with a bandpass filter with a high quality factor. The output of the highpass filter is then scaled by a gain controlled from A0.
 +
** Look inside the subpatches that are named ''pd <name>'' by double-clicking on them.
 +
** In the next parts of the lab, you will learn how to connect a proper sensor to A0 to improve the quality of the sensing.
  
  
== Play Around With the Patches ==
 
  
* Go back to ''pd'' and open the patch labeled ''myinstrument.pd'' inside ''software_lab_pd''. Make sure that ''compute audio'' is set to on and ''qjackctl'' is still open and running. Play around with the patch. You should be able to exhaust its musical potential in a matter of minutes; reflect on its strengths and limitations.
 
  
* Also try to understand how it works as a piece of software. (But please don't get hung up on the arcana - as always, if you get stuck, ask for help rather than waste time.)
 
  
 +
== Routing Power On The Breadboard ==
 +
* Remind yourself about how the sockets on the breadboard are wired together:
  
 +
[[Image:Breadboard.png]]
  
 +
* Now you are going to start putting jumper wires into your breadboard. Try to be careful to build the circuit correctly. (If you create a short circuit (one kind of wiring mistake), then the lights will instantly all go off on the Arduino. If this happens, please try to undo the short circuit right away.)
  
==Documentation==
+
* Now connect jumper wires as shown in the image below so that the upper and lower long columns can serve as a power supply for your future circuits.
  
* Right-click or option-click on any object to get a contextual menu including "help," which opens that object's help patch. (If you are using a Mac and don't have a right mouse button, then go to the ''X11'' pull-down menu, select ''Preferences'', and make sure that ''Emulate three button mouse'' is checked in the ''Input'' pane. Now, you should be able to right-click by clicking while holding down the Command key.)
+
* Connect a short jumper from the GND pin of the Arduino to the blue column.
  
* Right-click on a blank portion of a Pd patch. Now when you select "help" you get a list of Pd's built-in objects, arranged by category.
+
* Connect a short jumper from the 5V pin of the Arduino to the red column.
  
* In the upper right hand corner of each Pd window is a "help" menu. This accesses the Pd tutorials as well as some online reference documentation.
+
* Finally, use two longer jumpers to connect together the blue columns and the red columns as shown below:
  
 +
[[Image:0.png|500px]]
  
 +
* Check your wires again to make sure that you did it correctly!
  
  
==Short questions==
 
Why is the following patch a bad idea?
 
  
[[Image:badidea.gif]]
 
  
Make a patch that shows how to connect some objects together to calculate the function ''1-x'' where ''x'' is an input number.  Save the patch in a file called ''OneMinus''.
 
  
 +
== Connect Your Analog Sensor To Pin A0 ==
 +
Each participant should have one analog sensor in his or her kit. Optionally go to one of the following links to learn more about [https://ccrma.stanford.edu/wiki/Introduction_to_Electronics electronics] or [https://ccrma.stanford.edu/wiki/Sensors sensors]. '''Ask one of the staff for help if you feel uncomfortable with electronics. We will help you.''' Note that in the schematics below, you should connect the ''A0'' pin on the Arduino where it says ''V'' in the schematic.
  
 +
=== Force-Sensing Resistor ===
 +
If you have a force-sensing resistor, you can hook it up to an analog input of the Arduino by building a [http://en.wikipedia.org/wiki/Voltage_divider voltage divider] out of it with a 33k fixed resistor.
 +
The idea is that you put two resistors in series between power and ground: one that changes resistance (your sensor), and one of a known, fixed resistance. At the point in between the two resistors, you can measure how much the voltage has dropped through the first resistor. This value changes as the ratio of resistances between variable and fixed resistors change.
  
 +
* force-sensitive resistor (FSR):
  
== Design a different musical interaction ==
+
[[Image:FSR.png]]
  
Here are some ideas of changes that might make the patch more interesting:
+
=== Soft-Pot ===
 +
* If instead you have a soft-pot or a standard potentiometer, then you can wire it up this way:
  
* Involve more QWERTY keys
+
[[Image:Pot.png]]
* Involve the mouse (see the [MouseState] object)
+
* Load in a larger collection of samples.
+
** Implement a mechanism to switch among banks of samples
+
* Multiple gestures to one result: design a way for the parameters of each triggered note to depend on multiple key presses. For example, maybe only the space bar triggers notes, and all the other keys determine parameters of notes.
+
** Make your patch automatically generate a bassline as a function of the key presses
+
** Set multiple parameters modally, as volume works in the sample patch
+
** Use chording: keep track of all the keys that are currently pressed, and use only that information to set the parameters for each note.
+
* One gesture to multiple results
+
** Use the "metro" object to trigger a steady stream of notes. Now you have two new parameters: repetition rate, and whether the metro is on or off.
+
** Use the "counter" object to step through a cycle (of samples, parameter settings, etc.)
+
** You could combine "metro" and "counter" to build a rudimentary sequencer that can step through a rhythmic pattern
+
** Invent a mechanism to record short sequences of keypresses and play them back in time.
+
* Incorporate looping or other interactive controls over the soundfile playback
+
* Use Pd's "spigot" object to route control information to different parts of your patch at different times
+
* Use some additional signal processing such as a filter, delay line, reverb, tremolo, etc. This gives you more parameters to control.
+
* Polyphony: make it so the patch can play multiple samples at the same time. (Hint: put multiple copies of "play-sample" in your patch)
+
* Use a totally different form of sound synthesis, such as FM, granular, or physical modeling.
+
  
We recommend that you pick '''only one or a small number''' of these and work on it in depth, iterating on both the program/test/debug cycle as well as the design/implement/play cycle to craft something that has actual musical potential or is at least more fun to play. If you have an existing idea for your class project, you could use this lab to start thinking about implementing some of the modes and mappings. By all means, if you're inspired to try something else, go for it. If you'd rather spend today getting more of a broad sense of Pd's capabilities, feel free to work on many of these suggestions.
+
=== Range Sensor ===
 +
* If you have an infra-red range sensor, then connect the black wire to ground, the red wire to 5V (power), and connect the other wire directly to an analog input on the Arduino.


== The Community ==
 
  
There is a large, dedicated, and very generous community of Pd users on the Internet. Do some web searching (e.g., with a search engine, or else starting from some more specific resources) and look for interesting externals and/or patches. '''Optional:''' Download, install, and play with at least one. Can you incorporate it into what you programmed in the previous part?
+
== Make Your Tangible Embedded Prototype ==
 +
* '''Now use these tools to make a completed prototype by editing ''~/on-startup/default-patch.pd'' '''
 +
* '''This way, each time you power up your kit (whether or not a laptop is connected), it will run your modified patch.'''
 +
* '''For additional exercises or things to think about, you may want to look at the [https://ccrma.stanford.edu/wiki/Further_Reading Further Reading] or down below also.'''
  
For more help in finding resources, don't forget to look on the [[PID Links]] page.


 +
== Troubleshooting ==
 +
* Note that only one program or patch can use the Arduino at the same time.
 +
* If you are having troubles, make sure that you do not have multiple copies of pd running and/or that you only have one patch open that accesses the Arduino.
  
== Appendix: Troubleshooting ==
 
Tips:
 
* Type <tt>dmesg</tt> to see if there are any relevant messages that look like error messages.
 
* Check if the Jack audio server has crashed. If so, then restart it.
 
  
Solutions:
 
* If you are running out of space on the SD card, you can free up some space by deleting items in <tt>/usr/src</tt>. For instance, all of the files needed for building Pure Data Extended are rather large.
 
* If you are unable to access the internet from Satellite CCRMA, and you are not at CCRMA, then you may need to change the DNS nameserver specified in <tt>/etc/resolv.conf</tt> You could do this using the <tt>set-DNS-server</tt> command.


 +
== Appendix A. Transferring Files To and From Your Kit ==
 +
* Download [http://cyberduck.ch/ CyberDuck] to your laptop to make it easy to transfer files back and forth from your kit.
 +
* Start CyberDuck on your laptop, and then create the following new bookmark:
  
 +
[[Image:Bookmark.png]]
  
== Optional: Programming Linux ==
+
* Once you have finished entering the text, close the bookmark window.
'''We don't actually expect you to do anything here, we are just providing some more information that is maybe helpful for you linux gurus.''' Since ccrma@satellite runs ubuntu linux on an OMAP chip, many standard software packages have been compiled for it. This is why we were easily able to install software such as Jack, [http://audacity.sourceforge.net/ Audacity], [http://chuck.cs.princeton.edu/ ChucK], [http://faust.grame.fr/ Faust], [https://ccrma.stanford.edu/groups/soundwire/software/jacktrip/ Jacktrip], and the Arduino software.
+
* Then you can use CyberDuck to connect to your Satellite CCRMA kit by double clicking on the ''SFTP to Satellite CCRMA'' bookmark.
 +
* After you enter the password ''temppwd'', CyberDuck will connect and open window to open up showing the files in the /home/ccrma home directory on your kit.
 +
* You can drag and drop files from here to move them back and forth.
 +
* If you move WAV files to your kit, please remember that the default sampling rate for pd is 22kHz, so you may want to resample them first. For example, [http://audacity.sourceforge.net/ Audacity] can be used to resample the audio files.
  
If you are lucky, you can install your favorite software using the ''apt-get'' utility. To get a list of packages available on the OMAP's ARM architecture, type
 
  
''sudo apt-cache pkgnames''
 
  
You will notice that this list is way too long to look at. You can pipe it to the text file using the command
 
  
''sudo apt-cache pkgnames > packages.txt''
 
  
and then look at it using ''emacs packages.txt'', or you search for a particular package, such as
 
  
''sudo apt-cache pkgnames | grep emacs''.
+
== Appendix B. Learn A Lot More About Pd ==
 +
* Here are some lists of pd objects that you can use to discover new object names: [http://protman.com/content/list-puredata-objects-and-extended-objects http://protman.com/content/list-puredata-objects-and-extended-objects] [http://www.umatic.nl/workshop/objects.txt http://www.umatic.nl/workshop/objects.txt]
 +
* Go to the ''Help'' pull-down menu, choose ''Browser,'' go into ''Pure Data'' (near the top), and then look through the demonstration pd patches that are organized into chapters.
 +
* For even more further learning, see the labs from the [http://ccrma.stanford.edu/courses/250a Music 250A] course, which are stored in ''~/pd/labs-Music-250a-2012''
 +
Advanced demo patches for users who have a monitor or pico projector connected:
 +
* The pd patches in ''~/pd/examples/SimpleGraphicsOSC'' can be used to send OSC messages to the ''SimpleGraphics'' executable to render hardware-accelerated graphics.
 +
* OR, the patch ''~/pd/examples/just-play-video/trigger-omxplayer.pd'' can be used to trigger the playback of H.264 or MPEG2-encoded video clips.
  
Or, you can compile linux software yourself on the Beagleboard. The gcc, g++ tools etc. are already installed.
 
  
Type the ''df'' command. You can see that there is not a whole lot more than 1GB available on the SD card, so you should only install software if you decide that you need it.


 +
== Epilogue I. Protect The Flash Memory ==
 +
* Once you are completely done making your prototype, then run the command ''disable-flash-writes''
 +
* After this, any changes you make to your memory card will not be persistent. This means that you can power down your kit at any time without any warning (for instance if it is in a museum), and you do not have to worry about the disk integrity (as you would with your laptop for instance if its power were suddenly cut). If you change your mind later, you can always run the command ''enable-flash-writes'' to undo this step.
 +
* (If you prefer not to protect the memory of your kit, then when you are finished and before you power it down, kindly remember to run the command ''sudo halt'', enter the password, and then wait 20 seconds before removing the power.)
  
  
== Halt Your Board Properly When Finished! ==
 
'''Remember to shut down your board when you are done before powering it off!''' (Of course, if you are operating ''truly'' autonomously, of course you cannot login and run the halt command. Nevertheless, if it is not too inconvenient please try to shut down properly if you can. If you do not, then you may find that your memory card becomes corrupted.)


 +
== Epilogue II. End Of Workshop ==
 +
* We will evaluate each others’ interactions in pairs and then share the results in a concluding roundtable discussion.
  
 +
* When you are at home, you can hopefully connect your kit directly to an Internet router (warning -- sometimes you may experience some hiccups):
 +
** Power up your Satellite CCRMA kit again with it plugged into your Internet router at home.
 +
** Now you can hopefully login from any other computer at home using the command ''ssh -XY ccrma@satellite.local"
 +
** If that doesn't work, you can either plug in a monitor and see what IP address CCRMA Satellite reports it has at the end of boot, or if you have a Mac or Linux, you can run the following command in the terminal to help you determine what IP address your Satellite CCRMA kit may have been assigned by the local router. The following version scans the addresses 192.168.1.1 through 192.168.1.254, but edit as necessary for your home network:  ''for ip in 192.168.1.{1..254}; do ping -t 1 -c 2 -i 0.2 $ip > /dev/null && echo "${ip} is up"; done''
 +
 +
** Now, after you are logged into your kit, verify that you can access the Internet by running ''ping yahoo.com''
 +
** If you still cannot access the Internet from your kit, then find out the IP address of the name server for your network and then set it using ''set-name-server <IP_address_of_correct_name_server>''
 +
** At this point, you may be interested in other advanced features, so see a [https://ccrma.stanford.edu/wiki/Useful_Commands_for_the_Satellite list of other useful commands].
  
== Copying Files To and From Your Kit ==
+
* Finally, for more information, please see the [https://ccrma.stanford.edu/satellite Satellite CCRMA main web page].
* Alternatively, if you would like to use software with a nice GUI for copying files back and forth from your kit, you can install additional special software on your laptop.  For Windows, install [https://itservices.stanford.edu/service/ess/pc/securefx Secure FX], or for Mac OS X, install [https://itservices.stanford.edu/service/ess/mac/fetch Fetch].  These programs actually use scp, but they hide the details of the pathnames from you.
+


== More Pd resources ==
 
* Here are some lists of pd objects that you can use to discover new object names: [http://protman.com/content/list-puredata-objects-and-extended-objects http://protman.com/content/list-puredata-objects-and-extended-objects] [http://www.umatic.nl/workshop/objects.txt http://www.umatic.nl/workshop/objects.txt]


Latest revision as of 06:40, 14 December 2015

These instructions have most recently been heavily edited by Edgar Berdahl

(Some portions of the teaching materials may have been contributed by other authors such as Wendy Ju, Bill Verplank, Michael Gurevich, Spencer Salazar, Matt Wright, etc.)


This workshop consists of a condensed version of the material from labs 1 and 2 for the course Music 250A at Stanford University. For this workshop you need your Satellite CCRMA kit, a laptop computer with Ethernet adaptor to program it, and some headphones with a mini 1/8" (2.54mm) stereo jack.

You are also invited to bring the following optional items, but they are by no means required:

  • Some of your favorite breadboardable sensors and LEDs.
  • A set of small, battery powered speakers with 1/8" (2.54mm) jack.
  • A pico projector with cable to HDMI connector.

Prior to coming to the workshop, you may wish to read more about Satellite CCRMA, Pure Data, Raspberry Pi, or the Arduino Nano.


Introductions

  • Participants explain their backgrounds and what they would like to get out of the workshop.
  • Show some videos of prior projects
  • Construct Satellite CCRMA kits


Powering Up For The First Time

Plug the Ethernet port of the Satellite CCRMA into your laptop. Then use the provided power adaptor to power up the Raspberry Pi via the USB micro port. You should see some lights turn on, flickering every now and then. This means that Satellite CCRMA is booting up.


Connect To Satellite CCRMA

In order to see what your Satellite CCRMA kit is doing and program it, you need to log in to it. To do so, follow these instructions.

After you login, you will see the prompt ccrma@satellite:~$ This means that you are logged into a computer named "satellite" as the user "ccrma", and you are currently in the directory ~, which is the shortcut for your home directory.


Stop Default Patch and Run Pd

  • In order to be able to hear audio, you will need to plug a pair of ear buds, headphones, or loudspeakers into the 1/8" (2.54mm) jack labeled AUDIO OUT on the Raspberry Pi. Be careful when plugging the headphones in and not to pull too hard on the headphone cable!
  • A default pd patch starts running automatically when your kit finishes booting up. If your kit is configured correctly, the only evidence you will have of this is some sound in the headphones (you might have to touch the A0 pin on the Arduino with your finger to hear the sound). To stop the default patch, run the command

stop-default

When you run this command, you will observe that the sound in the headphones stops.

Remember that each time you boot up your kit and want to edit your patch, you should stop the default patch from running by using the command stop-default

  • Start pd now again with the following command:

pd &

This time the graphical user interface (GUI) for pd should also start.

  • To start audio, click on the Compute audio checkbox.
  • Now to test audio, go to the media pull-down menu and choose Test Audio and MIDI. If you still do not here any sound, then probably you missed one of the steps so far. If you look at the messages in the main pd window, you might find a clue.
  • Once you have audio working, close the window test audio and MIDI window.


Learn A Little More About Pd

If you get stuck at some point while learning about pd, remember that you can right-click on an object to get help information about the object.

  • The patch ~/pd/examples/just-play-WAV-files/play-WAV-file.pd shows the easiest way to play a WAV file.
  • Look at the pd lecture patches stored in ~/pd/pd-lecture (For example, see the patch 4_algorithmic_music.pd. Make sure that audio is on and increase the volume from zero in the patch.)
  • By default, the patch ~/on-startup/default-patch.pd runs right when the kit finishes booting up. Open this patch manually from within pd.
    • Look at the left side of the patch. You will see that this patch automatically enables audio 8 seconds (i.e. 8000 milliseconds) after the patch is opened.
    • Now, if you touch the A0 pin or the Arduino with your hand, you should be able to hear the sound of a windy day. (If you still don't hear anything, try touching a grounded object with your other hand.)
    • The patch works by filtering white noise (from noise~) with a bandpass filter with a high quality factor. The output of the highpass filter is then scaled by a gain controlled from A0.
    • Look inside the subpatches that are named pd <name> by double-clicking on them.
    • In the next parts of the lab, you will learn how to connect a proper sensor to A0 to improve the quality of the sensing.


Routing Power On The Breadboard

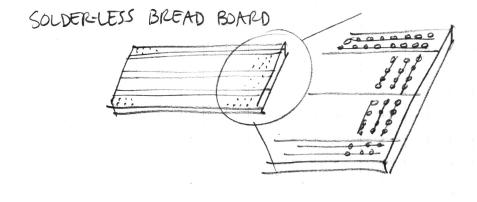
  • Remind yourself about how the sockets on the breadboard are wired together:

Breadboard.png

  • Now you are going to start putting jumper wires into your breadboard. Try to be careful to build the circuit correctly. (If you create a short circuit (one kind of wiring mistake), then the lights will instantly all go off on the Arduino. If this happens, please try to undo the short circuit right away.)
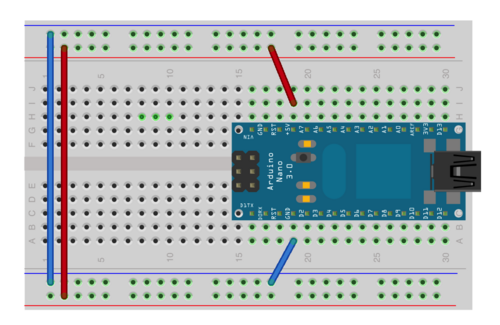
  • Now connect jumper wires as shown in the image below so that the upper and lower long columns can serve as a power supply for your future circuits.
  • Connect a short jumper from the GND pin of the Arduino to the blue column.
  • Connect a short jumper from the 5V pin of the Arduino to the red column.
  • Finally, use two longer jumpers to connect together the blue columns and the red columns as shown below:

0.png

  • Check your wires again to make sure that you did it correctly!


Connect Your Analog Sensor To Pin A0

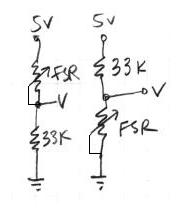
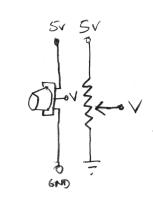
Each participant should have one analog sensor in his or her kit. Optionally go to one of the following links to learn more about electronics or sensors. Ask one of the staff for help if you feel uncomfortable with electronics. We will help you. Note that in the schematics below, you should connect the A0 pin on the Arduino where it says V in the schematic.

Force-Sensing Resistor

If you have a force-sensing resistor, you can hook it up to an analog input of the Arduino by building a voltage divider out of it with a 33k fixed resistor. The idea is that you put two resistors in series between power and ground: one that changes resistance (your sensor), and one of a known, fixed resistance. At the point in between the two resistors, you can measure how much the voltage has dropped through the first resistor. This value changes as the ratio of resistances between variable and fixed resistors change.

  • force-sensitive resistor (FSR):

FSR.png

Soft-Pot

  • If instead you have a soft-pot or a standard potentiometer, then you can wire it up this way:

Pot.png

Range Sensor

  • If you have an infra-red range sensor, then connect the black wire to ground, the red wire to 5V (power), and connect the other wire directly to an analog input on the Arduino.


Make Your Tangible Embedded Prototype

  • Now use these tools to make a completed prototype by editing ~/on-startup/default-patch.pd
  • This way, each time you power up your kit (whether or not a laptop is connected), it will run your modified patch.
  • For additional exercises or things to think about, you may want to look at the Further Reading or down below also.


Troubleshooting

  • Note that only one program or patch can use the Arduino at the same time.
  • If you are having troubles, make sure that you do not have multiple copies of pd running and/or that you only have one patch open that accesses the Arduino.


Appendix A. Transferring Files To and From Your Kit

  • Download CyberDuck to your laptop to make it easy to transfer files back and forth from your kit.
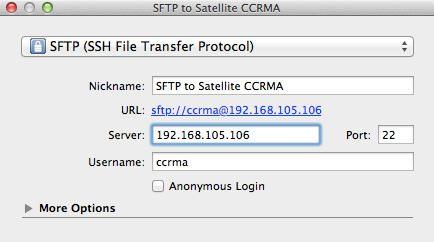
  • Start CyberDuck on your laptop, and then create the following new bookmark:

Bookmark.png

  • Once you have finished entering the text, close the bookmark window.
  • Then you can use CyberDuck to connect to your Satellite CCRMA kit by double clicking on the SFTP to Satellite CCRMA bookmark.
  • After you enter the password temppwd, CyberDuck will connect and open window to open up showing the files in the /home/ccrma home directory on your kit.
  • You can drag and drop files from here to move them back and forth.
  • If you move WAV files to your kit, please remember that the default sampling rate for pd is 22kHz, so you may want to resample them first. For example, Audacity can be used to resample the audio files.


Appendix B. Learn A Lot More About Pd

Advanced demo patches for users who have a monitor or pico projector connected:

  • The pd patches in ~/pd/examples/SimpleGraphicsOSC can be used to send OSC messages to the SimpleGraphics executable to render hardware-accelerated graphics.
  • OR, the patch ~/pd/examples/just-play-video/trigger-omxplayer.pd can be used to trigger the playback of H.264 or MPEG2-encoded video clips.


Epilogue I. Protect The Flash Memory

  • Once you are completely done making your prototype, then run the command disable-flash-writes
  • After this, any changes you make to your memory card will not be persistent. This means that you can power down your kit at any time without any warning (for instance if it is in a museum), and you do not have to worry about the disk integrity (as you would with your laptop for instance if its power were suddenly cut). If you change your mind later, you can always run the command enable-flash-writes to undo this step.
  • (If you prefer not to protect the memory of your kit, then when you are finished and before you power it down, kindly remember to run the command sudo halt, enter the password, and then wait 20 seconds before removing the power.)


Epilogue II. End Of Workshop

  • We will evaluate each others’ interactions in pairs and then share the results in a concluding roundtable discussion.
  • When you are at home, you can hopefully connect your kit directly to an Internet router (warning -- sometimes you may experience some hiccups):
    • Power up your Satellite CCRMA kit again with it plugged into your Internet router at home.
    • Now you can hopefully login from any other computer at home using the command ssh -XY ccrma@satellite.local"
    • If that doesn't work, you can either plug in a monitor and see what IP address CCRMA Satellite reports it has at the end of boot, or if you have a Mac or Linux, you can run the following command in the terminal to help you determine what IP address your Satellite CCRMA kit may have been assigned by the local router. The following version scans the addresses 192.168.1.1 through 192.168.1.254, but edit as necessary for your home network: for ip in 192.168.1.{1..254}; do ping -t 1 -c 2 -i 0.2 $ip > /dev/null && echo "${ip} is up"; done
    • Now, after you are logged into your kit, verify that you can access the Internet by running ping yahoo.com
    • If you still cannot access the Internet from your kit, then find out the IP address of the name server for your network and then set it using set-name-server <IP_address_of_correct_name_server>
    • At this point, you may be interested in other advanced features, so see a list of other useful commands.


PID 2013