SLOrk/2016/station setup: Difference between revisions
Appearance
Created page with "This page details how to set up a SLOrk station. == Ingredients == * 1 large rectangular SLOrk pillow. * 1 small circular SLOrk pillow. * 1 small IKEA table. * 1 MOTU, prefer..." |
→Assembly: add picture of MOTU Ultralite mk3 panels |
||
| Line 28: | Line 28: | ||
#* Cables 1 and 2 plug into the MOTU main (left, right) outs. Cables 3-6 plug into MOTU analog audio out channels 1-4, respectively. | #* Cables 1 and 2 plug into the MOTU main (left, right) outs. Cables 3-6 plug into MOTU analog audio out channels 1-4, respectively. | ||
#* On the Hemi side, the channels are (from left to right) 1-6. | #* On the Hemi side, the channels are (from left to right) 1-6. | ||
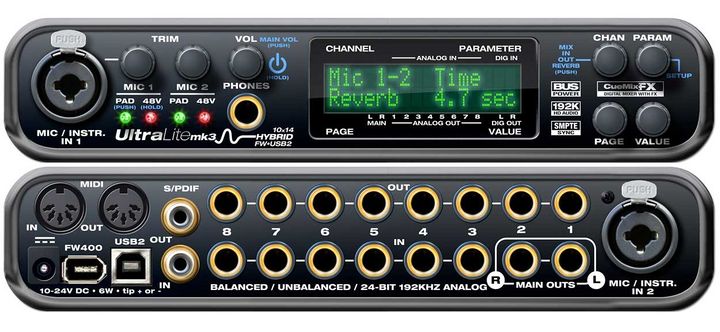
[[File:MOTU Ultralite mk3 panels.jpg|thumb|720px|left|The front (top) and back (bottom) panels for the MOTU Ultralite mk3.]] | |||
== Testing == | == Testing == | ||
Revision as of 22:58, 31 March 2016
This page details how to set up a SLOrk station.
Ingredients
- 1 large rectangular SLOrk pillow.
- 1 small circular SLOrk pillow.
- 1 small IKEA table.
- 1 MOTU, preferably the MOTU Ultralite mk3
- 1 firewire cable (for connecting MOTU to laptop)
- 1 Hemi speaker
- 1 power adapter (for Hemi speaker)
- 1 SLOrk Laptop (aka a SLOrktop)
- 1 laptop power adaptor
- 1 blue cable snake (6-channels, for connecting MOTU to SLOrktop)
Assembly
- Place the large rectangular pillow on the floor where you'll sit.
- Place the circular pillow on top of the rectangular pillow. This is where you'll be sitting.
- Place the small IKEA table directly in front of your pillows.
- Place the SLOrk laptop on top of the IKEA table.
- Place the MOTU directly underneath the IKEA table.
- Place the Hemi speaker next to the IKEA table.
- Plug in the laptop power.
- Plug in the Hemi speaker power.
- Use the Firewire cable to connect the MOTU to the laptop. (Note: when using the Firewire cable, we don't need a separate cable to power the MOTU.)
- Use the cable snake to connect the MOTU to the Hemi.
- The cables are numbered on each end.
- The jacks are fatter on one end than the other. IMPORTANT: you'll plug the fatter side into the Hemi, since they won't fit side-by-side into the MOTU.
- Cables 1 and 2 plug into the MOTU main (left, right) outs. Cables 3-6 plug into MOTU analog audio out channels 1-4, respectively.
- On the Hemi side, the channels are (from left to right) 1-6.

Testing
- Open up the laptop and sign in.
- Your MOTU should be powered on as well; use the MOTU's master volume knob and set it to -20 dB.
- In your laptop's system preferences, ensure that the sound output is the MOTU Ultralite.
- Open up a terminal and type
hemi-test. This will output a click in each channel successively, with ascending pitch. You should hear six distinct clicks over and over again. - Feel free to find us for troubleshooting, or consult the FAQs.