Tangible Embedded Linux
This workshop consists of a condensed version of the material from labs 1 and 2 for the course Music 250A at Stanford University. For this workshop you need your Satellite CCRMA kit, a laptop computer with Ethernet adaptor to program it, and some headphones with a mini 1/8" (2.54mm) stereo jack.
You are also invited to bring the following optional items, but they are by no means required:
- Some of your favorite breadboardable sensors and LEDs.
- A set of small, battery powered speakers with 1/8" (2.54mm) jack.
- A pico projector with cable to HDMI connector.
Introductions
- Participants explain their backgrounds and what they would like to get out of the studio.
- Show some videos of prior projects
- Construct Satellite CCRMA kits
Powering Up For The First Time
Plug the Ethernet port of the Satellite CCRMA into your laptop. Then use the USB micro cable to connect your laptop to the Raspberry Pi--this provides the power. You should see some lights turn on, flickering every now and then. This means that Satellite CCRMA is booting up.
Connect To Satellite CCRMA
In order to see what your Satellite CCRMA kit is doing and program it, you need to log in to it. To do so, follow these instructions.
After you login, you will see the prompt ccrma@satellite:~$ This means that you are logged into a computer named "satellite" as the user "ccrma", and you are currently in the directory ~, which is the shortcut for your home directory.
Stop Default Patch and Run Pd
- In order to be able to hear audio, you will need to plug a pair of ear buds, headphones, or loudspeakers into the 1/8" (2.54mm) jack labeled AUDIO OUT on the Raspberry Pi. Be careful when plugging the headphones in and not to pull too hard on the headphone cable!
- A default pd patch starts running automatically when your kit finishes booting up. To stop the default patch, run the command
stop-default
- Start pd now with the following command. The ampersand (&) is there to indicate that even though you are opening a new window, you should still be able to keep typing at the old terminal.
pd &
- To start audio, click on the Compute audio checkbox.
- Now to test audio, go to the media pull-down menu and choose Test Audio and MIDI. If you still do not here any sound, then probably you missed one of the steps so far. If you look at the messages in the main pd window, you might find a clue.
- Once you have audio working, close the window test audio and MIDI window.
Learn More About Pd
Spend as much time on this part of the workshop as you like.
- The patch ~/pd/examples/just-play-WAV-files/play-WAV-file.pd shows the easiest way to play a WAV file.
- Look at the pd lecture patches stored in ~/pd/pd-lecture
- For even more further learning, see the labs from the Music 250A course, which are stored in ~/pd/labs-Music-250a-2012
- Here are some lists of pd objects that you can use to discover new object names: http://protman.com/content/list-puredata-objects-and-extended-objects http://www.umatic.nl/workshop/objects.txt
Advanced for users who have a monitor or pico projector connected:
- The pd patches in ~/pd/examples/SimpleGraphicsOSC can be used to send OSC messages to the SimpleGraphics executable to render hardware-accelerated graphics.
- OR, the patch ~/pd/examples/just-play-video/trigger-omxplayer.pd can be used to trigger the playback of H.264 or MPEG2-encoded video clips.
Prepare Arduino
- The next step is to install some default firmware onto the Arduino so that it knows what we want it to do. Start the Arduino software in the terminal by typing
arduino &
- Open StandardFirmata from the Arduino software pull-down menus File|Examples|Firmata. Look at the program. This is what will control the Arduino.
- Select Arduino Nano w/ ATMega328 under Tools->Board and /dev/ttyUSB0 under Tools->Serial Port. Then hit the Play button to verify and compile the program.
- Upload the Firmata firmware to your Arduino Nano using upload button, the fourth square button from the left (the one with the sideways arrow). If you watch the RX and TX lights on the Arduino carefully, you will "see" the data flow over the serial USB link into the Arduino as the firmware is uploaded.
- Close the Arduino program by closing all of the Arduino windows. (This is important!)
Routing Power On The Breadboard
- When changing the circuit on the breadboard, it is a good idea to unplug the USB cable from the Arduino, so unplug it for now.
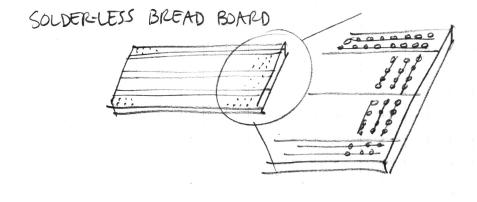
- Remind yourself about how the sockets on the breadboard are wired together:
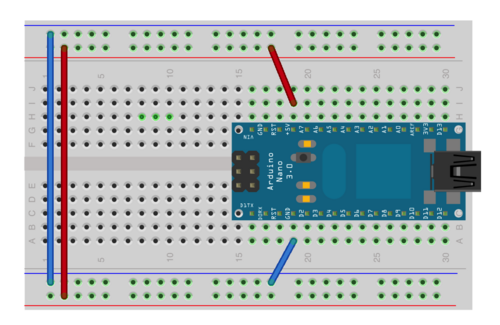
- Now connect jumper wires as shown in the image below so that the upper and lower long columns can serve as a power supply for your future circuits.
- Connect a short jumper from the GND pin of the Arduino to the blue column.
- Connect a short jumper from the 5V pin of the Arduino to the red column.
- Finally, use two longer jumpers to connect together the blue columns and the red columns as shown below:
- Check your wires now to make sure that you did it correctly!
- Now plug the USB cable back into the Arduino. You should see the blue light come back on on the Arduino. (If you don't, you have a short circuit! In other words, somehow you connected the wires together incorrectly, effectively connecting the 5V and the GND pins of the Arduino together. Unplug the USB cable again immediately and fix the circuit! Short circuits are big no-nos because they can (and often do!) destroy the Arduino. This is why we recommend unplugging the USB cable while you are changing your circuit.)
CyberDuck
You can use CyberDuck to get files
- Choose Open from the File menu and select the patch 4_algorithmic_music.pd. In the main pd-extended window, click on the compute audio button. Then go back to the patch, move the speed and width sliders slightly to the right, and bring up the volume. You should now hear some sound in your headphones. Play around with the parameters to see what new sounds you can discover.
Troubleshooting:

