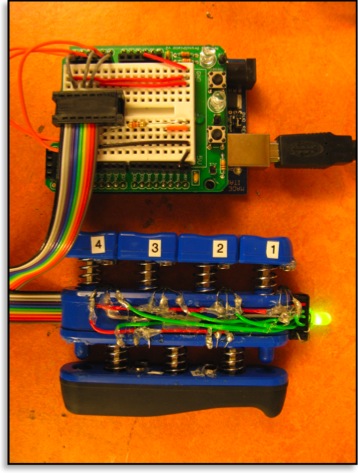
Students/michaelberger/250B/
From CCRMA Wiki
Revision as of 14:31, 18 March 2009 by Mpberger (Talk | contribs) (→Background, <i>the Mach 1 </i>[http://cm-wiki.stanford.edu/wiki/Students/michaelberger/220C/ (from Music 220C, Spring 2008)])
Contents
MUSIC 250B, Winter 2009, Research Page
This research page has been completed as part of the following assignment:
    Wiki "Community Service" Project

    As an end-of-term deliverable for 250b, prepare a helpful and factual Wiki page on the
    ccrma wiki on a topic relevant to the course. The goal of the wiki page is to create a
    repository for the facts, links and processes which sustained your work in 250b this term.
    The target audience for this page is the collection of future CCRMA students interested
    in HCI and music taking the 250 series of courses. Hopefully, your work will not only
    inspire their future work but will also act as a valuable resource from which they can get
    a head-start on similar projects, in a sense, "standing on the shoulders of giants"
    (yes, this means you are all "giants").
GRIP MAESTRO
Abstract
- The "GRIP MAESTRO" developed out of my desire to create an instrument for electroacoustic performance that not only maps well and is interesting to play and to hear, but also demands and promotes a great deal of performative energy from the performer. By doing this it is my hope to have a very strong connection not only between the performer and his instrument (through the need for physical effort in performance, and a corresponding physical feedback from the instrument), but also between the audience and the performer (through the visibility of this first relationship, and its audio correlates).
- The first version of the GRIP MAESTRO (designed and completed in the Spring of 2008 for Chris Chafe's Music 220C), the "Mach 1," aimed to accomplish the first half of this performative relationship system: that of the performer and the instrument. The resistance provided by the finger and palm pads of the Grip Master (more below, in the section on the 220C poster session) gives the performer a very good idea of the his/her playing position at any time, and allows him/her to "feel his/her way through the performance.
- The Mach 1 serves as a reliable proof of concept for this ideal situation, but comes bundled with several drawbacks that my current work on the instrument as sought to address.
- Firstly, the second half of my performative goals that there be a connection between the audience and the performer that is born directly out of the performers relationship with the instrument, is present in the Mach 1, but far too subtle. The limits of the interface as is, are explored and stressed in my current work for Music 250B through honed and new mapping ideas (discussed below). This consideration also plays a MAJOR role in the schematic changes that are presently in the works for the next version, the Mach 2.
- Secondly and more practically, the pad-resistance given by the hand exerciser's springs, is too high for the average user/performer. I do not condone the philosophy, rampant in the electronic musical interface world, that an instrument's performance practice should be immediately perfectible. As much as it pains me to admit, I am a fan of practice. However, since I also, do not wish to force hours of preparation onto my potential performers at this stage of the game, and since I have had several users complain about PAIN resulting from the use of the Mach 1, the Mach 2 is built upon a Grip Master with 40% less resistance (3 lbs, instead of 5).
- The GRIP MAESTRO: Mach 2 will be a two-handed instrument (2 devices, one in each hand) each instance of the Mach 2 will have not only the same 6 magnets and hall-effect sensors that made the Mach 1 famous, but also an accelerometer in the hopes (and through my previous work mapping gestures in SLOrk) that this will allow for larger and more dramatic gestures on the part of the performer, and so provide a very strong connection between the audience and the performer.
~
Background, the Mach 1 (from Music 220C, Spring 2008)
- Equipment & Parts (Summary -- for more details see my 220C research wiki linked above)
- 1 x GRIP MASTER hand exerciser. (5 lb resistance for each of 6 springs.)
- 6 x Hall Effect Sensors -- available here.
- 6 x (0.0625" 2.45lb Magnets).
- 1 x Arduino Diecimila with 1 x Arduino Protoshield Kit and 1 x mini-bread-board
- wires, solder, blood of one's enemies
- Construction -- (these are instructions for building the final working model of the Mach 1, there are steps that I took at the time, that were less than successful, that I will be omitting here)
- Tools -- Solder, Soldering GUN, Hot-Glue, (see schematics below)
- Steps --
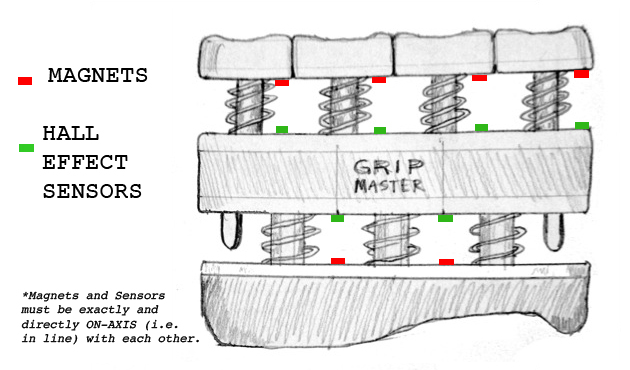
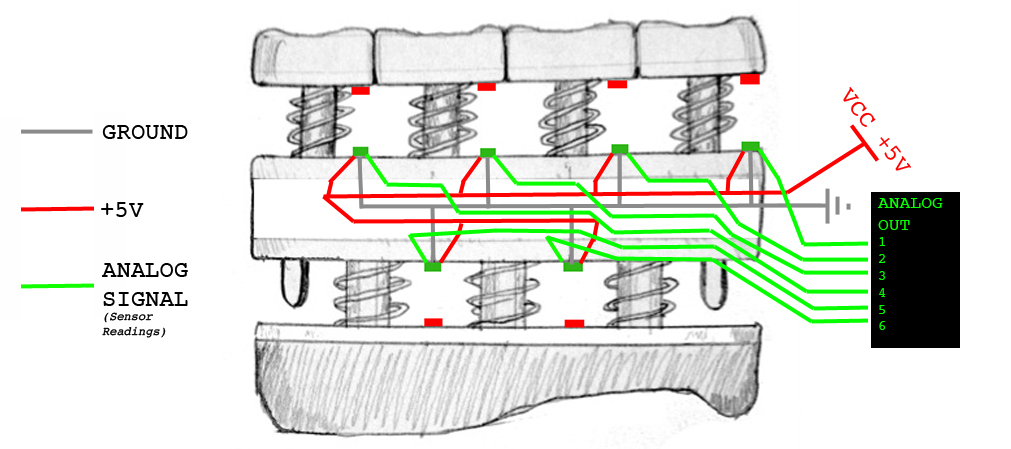
- 1) Glue Magnets one at a time (with hot-glue) to the underside of each finger pad. They should be placed equally distant from each 'side' of the pad and near the upper side of the spring. Two magnets should then also be glued between the springs (centered) on the palm pad. (see diagram below)
- 1b) At this point you may or may not need to allow time for the glue to set (More on this for the construction of the Mach 2, below).
- 2) HALL EFFECT sensors should then be hot-glued one at a time, directly opposite the attached magnets, so that they are ON-AXIS (i.e. in line) with each other. (again, see diagram below)
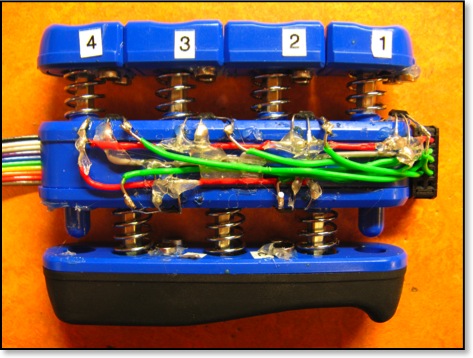
- 3) After all of these glued pieces have set, we may now begin soldering the wiring together. I recommend keeping your wires functionally separated by colour (i.e. grey/black for grounding, red for Voltage, Green for sensor out, etc...)
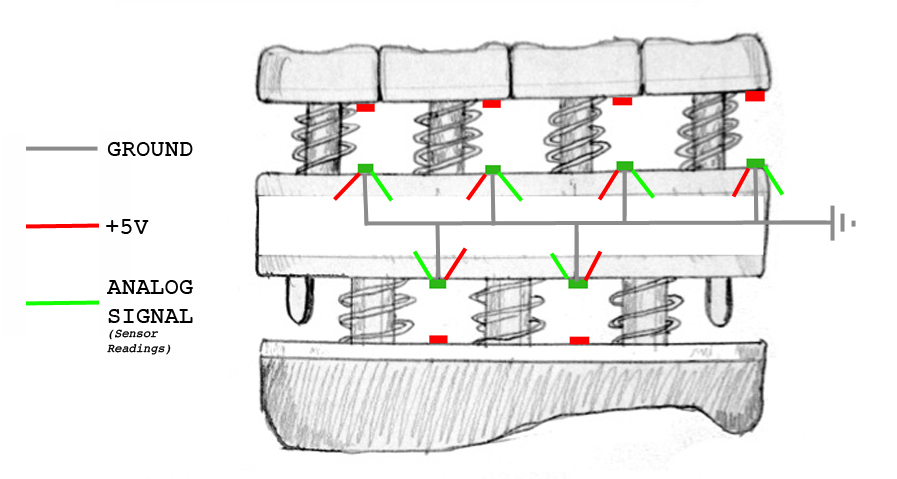
- a) First we will wire up the ground for each sensor in parallel. The ground from the HALL EFFECT sensors is the middle lead on each. (see diagram below)
- 3) After all of these glued pieces have set, we may now begin soldering the wiring together. I recommend keeping your wires functionally separated by colour (i.e. grey/black for grounding, red for Voltage, Green for sensor out, etc...)
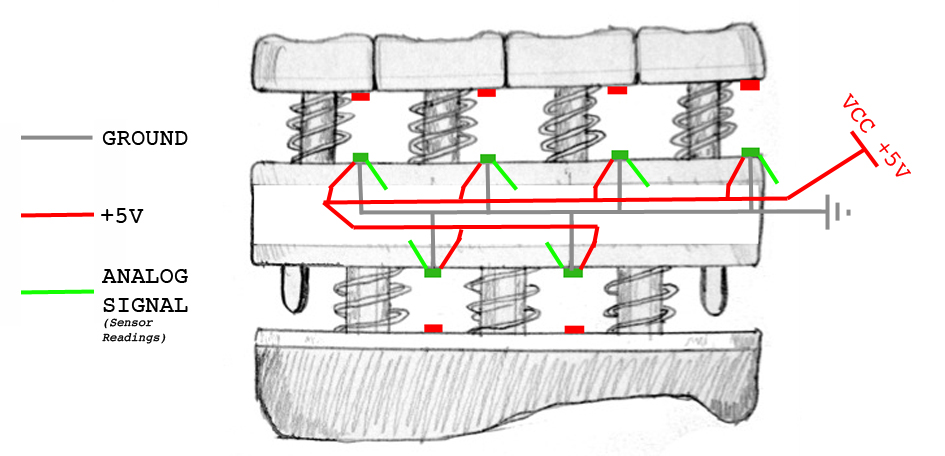
- b) Next, we will wire up the voltage also in parallel. The voltage for each sensor goes in on its leftmost lead. (see diagram below)
- the completed ground and power wiring will look something like this:
- c) Finally, we will wire up the sensor analog outputs, one wire for each sensor. (see diagram below)
- the ordering of analog outputs 5 and 6 is up to you. I believe in the end, I may have used a them in reverse order, with the higher numbers being farther away from the 'top' of the device.
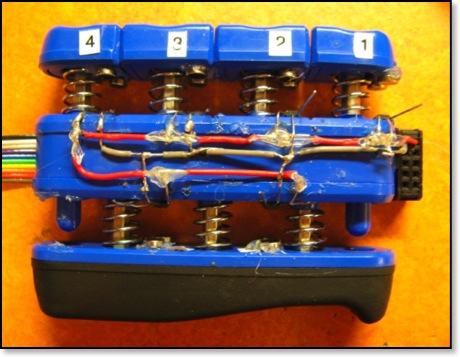
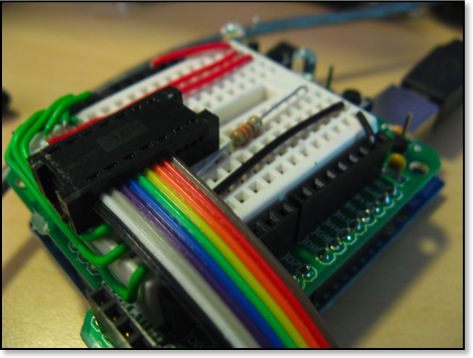
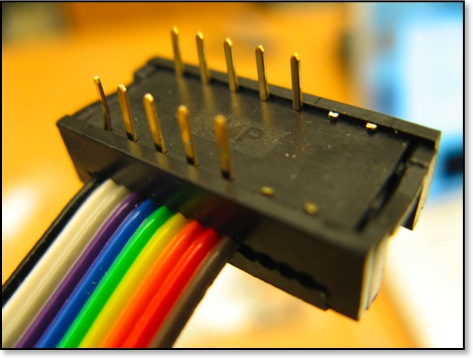
- 4) I use a ribbon wire with a female connector at the device-end and a male connector at the curcuit-board end.
- 5) As a final touch, a two-way LED is glued to the device-end connector and power and ground supplied through the final two holes in the connector. This not only looks mind-bogglingly amazing, but also functions as an indicator that the device is "ON" and plugged in correctly. If the connector is plugged in to the curcuit-board backwards, the LED will lightup RED instead of GREEN.
~
- POSTER SESSION @ CCRMA OPEN HOUSE 2008!
  Introduction
     Part of the Michael's ongoing research (supported by the Social Sciences and
  Humanities Research Council of Canada), the “GRIP MAESTRO” is the composer's
  latest attempt to incorporate real physical resistance and haptic feedback into
  an electroacoustic performance interface. The goals of this specific project
  are to take advantage of a simple physical gesture (not previously utilized by
  an existing acoustic instrument: see next section), and, by incorporating physical
  resistance, create an “easy to learn / difficult to master” interface for the
  creation of, and control over real-time electroacoustic performance in both a
  solo and ensemble setting.
     The “GRIP MAESTRO” is a modified hand exerciser called a “Grip Master”
  (see section below). By measuring the position of the pads on the device and carefully
  mapping them to parameters of music creation, Michael hopes that the “GRIP MAESTRO”
  will provide the feel, control, and aural feedback necessary to be an effective
  interface between performers and their music, and between audiences and their
  performers.
     Presently there are two mappings of the control data prepared in the ‘strongly
  timed’ programming language, “ChucK”. Michael is presently in the planning stages
  of a third, but there are a multitude of potential applications and mappings for
  which the “GRIP MAESTRO” is ideal.
~
  Movement & Resistance
     The action of gripping and squeezing by the hand(s) was chosen  early on to
  be the the central aspect of this interface.  Many existing acoustic and electro-
  acoustic instruments rely heavily on the performers hands as driving controlling
  agents, but few utilize and emphasize the motion of gripping specifically.
     In order for an interface to take full advantage of the motion of this activity,
  it needs to provide physical feedback and/or resistance to the activity consistently
  for the full range of its motion. It is very important to the composer that any given
  interface feature a real and innate physical feedback/resistance to the performer’s
  actions so that he or she may feel as closely in tune with that interface as possible
  and so that the sounds that are produced by the performative actions relate to the
  nature of the actions themselves.
~
  Grip Master
     A ‘hand-exerciser’ seemed the best choice for a physical object that: a)takes
  advantage of the full range of motion involved with the action of ‘gripping’, and
  b)provides real physical feedback/resistance to that action.
     The ProHands “GRIP MASTER” hand exerciser (available here) was quickly discovered
  and decided upon by Michael, who was drawn to several of this specific model’s key
  features. Among these were: each finger has its own independently but equally
  resistant pad, the palm has its own moderately rotating resistant pad, the devices
  are available in a number of different resistances, the small, transparent, yet
  solid construction makes the device easily upgradable, and its plastic body is
  naturally electrically insulated.
~
  Sensors & Sensing
     In order to translate the position of each of the GRIP MASTER pads to the
  computer as a number, Michael chose to attach magnets to each pad paired with
  Magnetic Hall Effect Sensors attached to the central body of the device. A 10-wire
  ribbon cable is used to connect the necessary Voltage (+5V) and Ground for each
  of the 6 sensors (each with a wire with which to take readings), and Voltage and
  Ground for an indicator LED (see circuit diagram and images below).  Each sensor
  and magnet pair needed to be directly aligned (on-axis) to ensure the most linear
  readings possible.  Two sensor/magnet pairs were placed on the palm pad in order
  to determine the angle of that pad.
  Mapping
     Utilizing excerpts of Max/MSP code by Daniel Jolliffe, “Arduino2Max,” Michael
  constructed a Max-patch (Serial2OSC.maxpat) that filters the incoming ‘analog’
  readings from the Arduino board, and broadcasts them via the U.C. Berkeley-developed
  UDP network protocol, Open Sound Control.  He then set up two programs in Ge Wang
  and Perry Cook’s ChucK to receive the messages (since ChucK is presently unable
  to receive data directly from the Arduino).
     The first program (GripMaestro-SinOsc.ck) maps the incoming floating point
  numbers (0. through 1.) of each of the four finger pads to a different sine
  oscillator’s frequency, and the palm pad to the sounds’ panning and overall
  amplitude.  This simple example demonstrates the degree of control that the
  performer has over musical materials with the “Grip Maestro.”
     The second program (GripMaestro-Granular.ck) is based upon code by Kyle
  Spratt from his piece, “I Miss My Uncle Charles.”  The original program listens
  to an incoming audio signal and parses it into small repeating “snippets”
  depending upon the variables that are given and controlled by the user by editing
  the ChucK code and replacing the already running “shred.”  In this mapping however
  the parameters of the program are controlled entirely by the “Grip Maestro”: the
  four finger pads control each of four sets of these original parameters where as
  the performer depresses a pad the amount of delay time increases, and the palm pad
  controls the playback speed of the audio signal, the size of the snippets, and the
  overall amplitude.  The use of the “Grip Maestro” allows for much faster and smoother
  changes of these control parameters, which in turn produces a more personal,
  potentially emotive performance.
~
  Future & Other
     There have been many similar developments in hand-controlled electronic interfaces
  (of particular interest is S.T.E.I.M.’s Michael Waisvisz’s “Hands”). Many ‘glove’
  interfaces lack the physical feedback I have proposed here is necessary to produce a
  truly personal and emotive connection with the interface and the music it produces,
  whilst other ‘button-based’ hand controllers may themselves or their controlling-
  gestures be more complicated than need be for an audience to intuit the performer-
  interface relationship.  It is my hope with the “Grip Maestro” that I have addressed
  these issues and come to an interesting solution.
     The “Grip Maestro’s” simple design allows for strongly coupled performance and sonic
  result for both the performer and the listener and for many flexible mappings as I hope
  these examples have demonstrated.  The next mapping that I am developing uses the finger
  pad readings to control the formant information in a vocal synthesizer. Future sensor-
  additions to the “Grip Maestro” might include a gyroscope or accelerometer to account
  for the player’s position and/or movement.
~
CCRMA CONCERT ~ Granular 1.0 Video
The Road to the "Mach 2" (MUSIC 250B)
- revising the Mach 1
- hardware
- Arduino Nano
- Multiplexor
- software
- arduino
- mappings
- Granular 2.0
- Vocal (video forthcoming)
- hardware
- expanded intentions
- the plan
- new parts
- Grip Master 3 lb
- Larger Breadboard
- Fatter Ribbon-Wire
- Accelerometer
- Multiplexor
- new construction (ongoing)
- Flush/Sunken Magnets
- Extra Wires
- new mappings (forthcoming)
