Jacktrip on OS X
This page describes how to set up jacktrip on your Mac OS X machine for network performances. jacktrip is not well supported for PPC Mac's, so these instructions are for Intel Mac's only (though you could always try).
System Setup
Get and Install Jack
Find out about what Jack (Jack Audio Connection Kit) is here [1]. It is essentially an application for connecting your sound card to 'Jack aware' audio programs like 'Jacktrip' with very low latency. Download it here http://www.jackosx.com. Unzip the download and install by clicking the Mac OS X installer package. Unless you know otherwise, just accept all the defaults for the install. You will be required to reboot your computer after the install.
jackdmp, the Jack application, will be installed here:
/usr/local/bin/jackdmp
Jack itself doesn't have a graphical user interface, so it can only be used from the command line. But, see Qjackctl below for an essential GUI. JackOSX comes with a GUI called JackPilot. Best to use Qjackctl instead.
Get and Install Qjackctl
Qjackctl is a front end GUI for Jack (jackdmp). It allows you to configure Jack parameters like sampling rate, buffer size, and to select an audio device. It also provides a means to start and stop Jack, monitor its status, and make connections between applications (like jacktrip) and audio devices. A binary can be found here: [2]. Find the Qjackctl section on this page. Click on the appropriate version of Qjackctl suitable for your Mac (most likely the latest version, for Intel Mac's) to download. Double click the dmg download file, to open. Install Qjackctl by dragging the icon into the Applications folder.
It's a very good idea to read the README that comes with Qjackctl, which explains some essential initial setting information, condensed here.
Open Qjackctl
Double click on the Qjackctl icon in your Applications folder. This does not start the Jack server, it just starts the GUI called Qjackctl. It looks like this (notice how it says 'Stopped'):
Initial Configuration
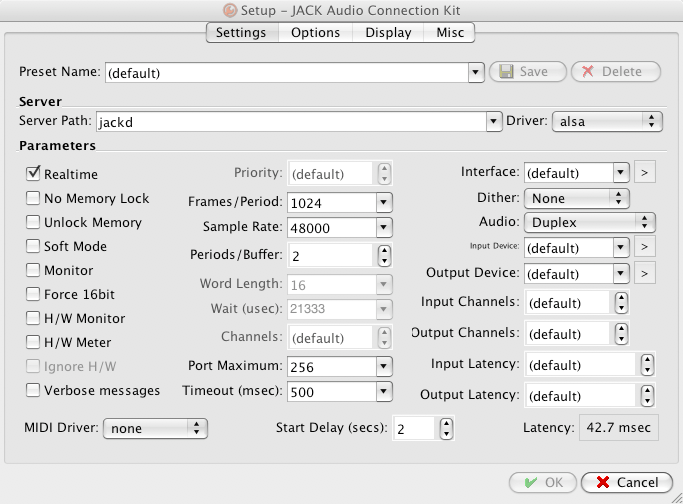
Click Setup..., which opens this window with default settings:
In the Server Path field enter, instead of jackd:
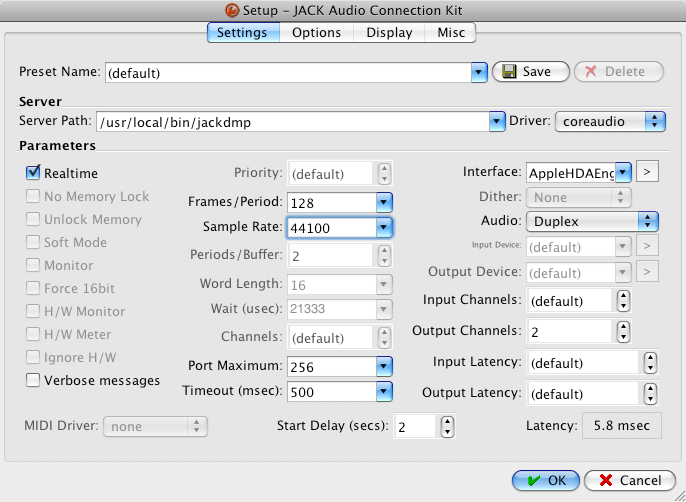
/usr/local/bin/jackdmp
And for the Driver drop down menu choose: coreaudio instead of alsa. Choose your particular sound card with Interface clicking the > button which give you choices of available interfaces (e.g. MOTU, Edirol, Built-in). These must be configured, or Jack won't work.
For further refinements that are best for jacktrip we want to use the smallest buffer size possible without dropping packets, usually 128 is a good place to start. By contrast, you would use larger buffer sizes for non-real-time applications like hard disk recording, which would better be served by a buffer size of 1024, for example. Depending on the network quality, the buffer size may need to be raised (adding some latency to the system). Both sides of a jacktrip connection must have the same buffer size and sample rate. So in the Frames/Period field enter 128. And choose your preferred sample rate, in this case 44100. Leave the remaining fields unchanged.
The newly configured window should look something like this:
Now save the configuration by clicking: OK.
Helpful Hints
There are several more buttons to click on the main Qjackctl interface that are worth mentioning. The Connect button opens an essential window used for routing signals, which is covered below. But, it's a good idea to know about the Message and Status windows, which are helpful for monitoring and troubleshooting. It's best to open these windows before you Start Jack, to see what's happening if things go wrong (or right).
Message Window
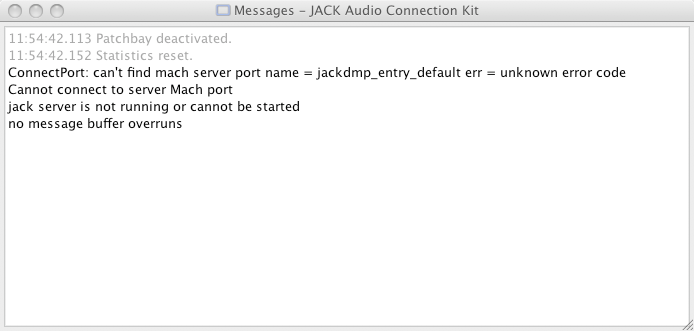
The Message window will give you detailed text output about what is happening with Jack (not jacktrip). This will be helpful when trying to get the system running, where troubleshooting would be involved.
It looks something like this (Jack is still not running at this point):
Status Window
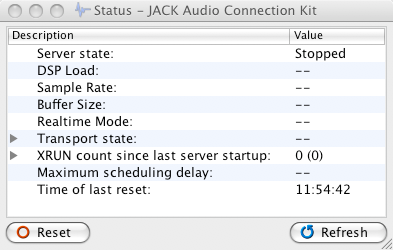
This is the Status window. It gives relevant information about the status of Jack. Notice the Refresh button for getting an update. Maybe most important here is the DSP Load, which gives an indication of the load on your computer, and the XRUN count. XRUN's are an indication of buffer under or over-run's, which cause clicks. XRUN's will also show up in the Message window. Some of the information in the Status window, is constantly refreshed in the main Qjackctl window.
Get and Install Jacktrip
You can find jacktrip's homepage with documentation here: [3]. Download the latest binary here: [4] by clicking on:
jacktrip-<latest version>-osx.zip
jacktrip is a simple unix binary which needs to be installed from the Terminal.app program. The instructions can be found in the "INSTALL.txt" file, which comes with Jacktrip. They are quoted here (bin/ in the line "go to bin/" refers to the "bin" directory in the downloaded and unzipped file tree):
To install (using Terminal): go to bin/ directory and type:

   sudo cp jacktrip /usr/bin/
   (enter your password when prompted)

   sudo chmod 755 /usr/bin/jacktrip
   (now you can run jacktrip from any directory using Terminal)
Using Jacktrip
Much of the below information is taken from the Jacktrip documentation page [5] under the heading: Using JackTrip.


