CCRMA Documentation links: index contents overview rooms account staff about
(contents of this file: links to each section)
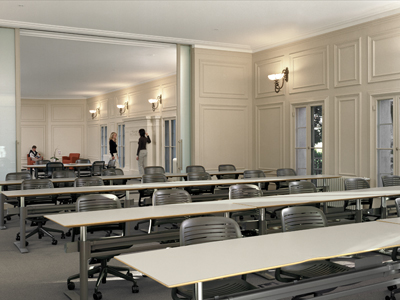
The CCRMA Classroom (Knoll 217) is CCRMA’s main teaching space.
In the front (not shown in the photo) are an upright piano, projection screen, whiteboards, pair of loudspeakers (Mackie HR824), and presenters’ desk.
The audience/students sit in rows of desks with convenient power outlets.
After using the Classroom, please:
An LG GRU510N 4K laser projector (manufacturer’s page) is mounted to the ceiling.
Use the Kramer system (including the convenient 3x5 button grid switcher labeled “PROJECTOR SOURCE”) to choose one video source for the projector:
HDMI Desk, the HDMI cable attached to the right corner
of the presenter’s desk, usually the easiest way to plug in the
presenter’s laptop.HDMI 2, an open HDMI jack on the panel just below the
Kramer.KVM is the video output from the KVM switch that can
select the Zoom Mac Mini, e.g., to see remote
people on the big projection screen. (Also excellent for video feedback
effects.)DVI, an open jack on the panel on the side of the
Kramer’s rack, using an obsolete
video format nobody needs or wants.Document Camera lets you project a realtime view of a
printed or handwritten document (perhaps some math you are working out
with paper and pen), mobile device, etc.DVD is our Oppo DVD/BluRay player, located at the
bottom of the rack below the Kramer.Google TV is not connected to any broadcast or
streaming platform; it’s just a proprietary gadget to support wireless
video streaming (from Android phones?)Apple TV is another proprietary gadget for wireless
video streaming (“AirPlay”),
only from Apple devices.VGA, an open jack on the panel just below the Kramer,
using another obsolete video format
nobody needs or wants.Use the mixer to mix the audio (including stereo from the selected HDMI source).
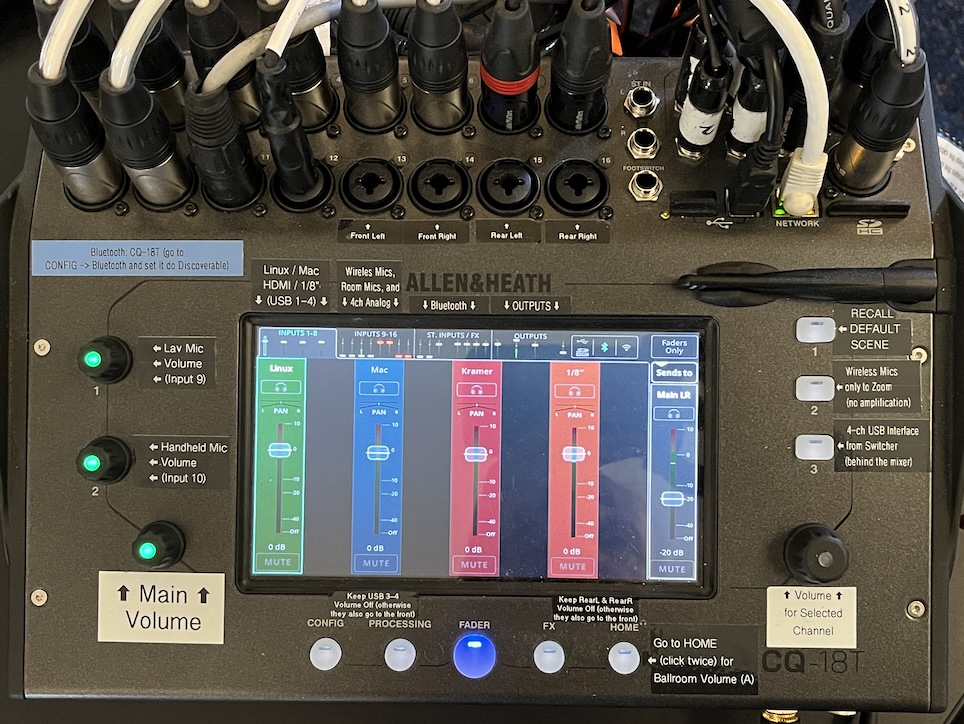
The heart of the Classroom’s audio system is an Allen & Heath
CQ-18T hardware digital mixing board (manufacturer’s
page). It features a touchscreen interface that switches according
to the five navigation buttons below it, typically FADER to
see and adjust levels. Navigation tabs along the top of the screen
choose subpages, e.g., for FADER they select among three
pages worth of input channels (1-8, 9-16, and USB/BlueTooth) and another
page of outputs.
You might want to download their CQ MixPad app (under “Software Downloads”) at the manufacturer’s resources page.
The four labeled front-panel knobs control the “most important” volumes:
Three three labeled buttons on the right select the mixer’s most important configurations (“scenes”):
The mixer has 16 analog inputs plus USB and Bluetooth, arranged over
two tabs of the FADER touchscreen interface.
Inputs 1-8 are four ganged stereo pairs (each appearing on the screen as only a single stereo channel):
External Headphones) in 1/8” stereo unbalanced analog, via
a green Radial ProD2 Stereo Direct Box.
1/8", attached to
the right corner of the presenter’s desk (next to the
HDMI Desk cable), with an 1/8” (aka 3.5mm) TRS stereo
unbalanced male connector, meant to plug into the headphone jack of a
laptop, phone, etc. (The other end of this cable has dual XLR plugged
into the mixer.)
Inputs 9-16 are eight separate mono sources:
MIC2), never to the loudspeakers
(which would only cause horrible squealing feedback).
MIC2),
never to the loudspeakers (which would only cause horrible squealing
feedback).
Stereo inputs:
CQ18T - Audio). A small 4x1 USB switch just behind the
mixer, labeled “CQ Mixer Multichannel USB Audio Interface”, switches
this USB audio device among LAPTOP (a dangling USB cabled
labeled “Laptop USB Audio”), MAC,
or LINUX. XXX how to route
this through mixer?
Discoverable (via
CONFIG button and the tab with the Bluetooth logo)
then your Bluetooth source will be able to pair with the device
CQ18T and wirelessly send lossy stereo to these
channels.
Four of the mixer’s output signals feed the four loudspeakers:
Another four feed the drum machine:
MIC1
analog inputs (1/8” unbalanced stereo), the same two signals that go to
the front two loudspeakers (but not affected by the “Main
Volume” knob), via a Radial ProAV2 stereo DI Box.
MIC2
analog inputs (1/8” unbalanced stereo), from the microphones that go
only to Zoom and not to the loudspeakers (because they
would feed back), via a Radial Trim Two Passive Stereo DI Box.
Main Volume and the
headphones A volume (accessible via the HOME
button). (The actual headphones connect to the ATEM, not the mixer.)
What’s going on with all this gadgetry?!?
The Kramer and audio mixer control what people in the room see (on the projector) and hear (from the 4 loudspeakers).
Audio from mics, an analog input cable, the Kramer (selected HDMI), and the Zoom Mac mini (so you can hear when people ask questions over Zoom) go into the audio system: an Allen & Heath CQ-18T mixer. The mix drives three sound systems:
A gain
control)The video output of the Kramer is split to produce three identical mirrored copies sent to:
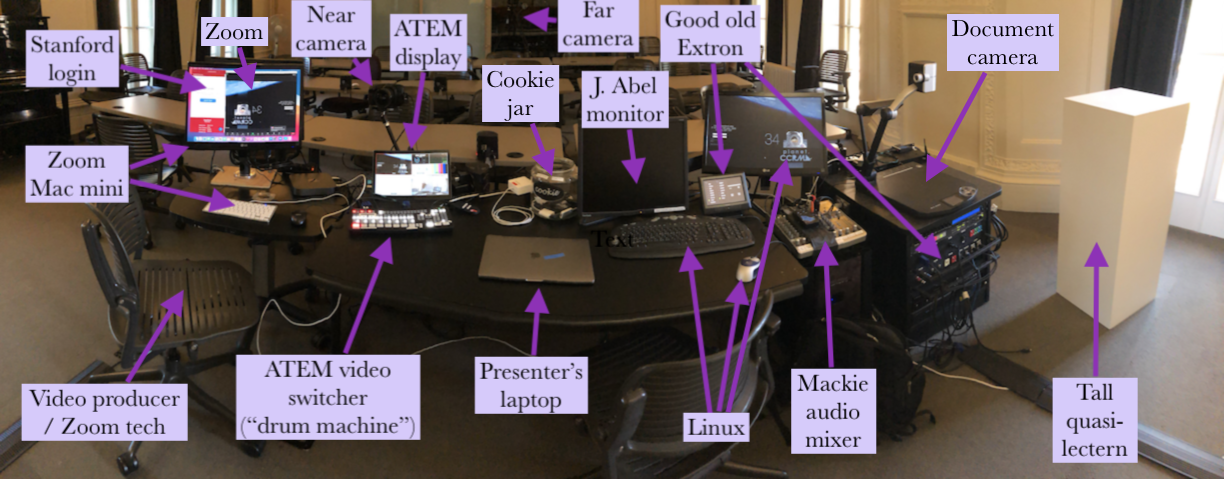
The video production system essentially consists of the cameras and video switcher (“Drum Machine”)
We now have three AVER TR313 V2 pan/tilt/zoom auto-tracking cameras (manufacturer’s product page) to cover the Classroom:
The Desk camera is mounted on the desk to get a close-up of the presenter’s face (typically using auto tracking)
The Front camera is located at the front of the room (between the projection screen and the door to the closet), pointed at the faces of the audience.
The Rear camera is located at the rear of the room (underneath the rear left loudspeaker), pointed at the presenter, projection screen, and the backs of the heads of the audience.
Each is selectable from the video switcher as an image source.
Each is controllable from a handheld remote control. The top row of buttons selects which of the three cameras the remote is “talking to”, which is almost always #1 because Front and Rear default to useful wide-angle shots but Desk works best when tracking the presenter.
You can manually position the image with the four
directional arrow buttons (up, down, left, right) and manually
zoom by pressing + (zoom in) or -
(zoom out) on either the ZOOM SLOW or
ZOOM FAST buttons of the remote control.
The auto tracking feature will “latch onto” a person (such as the presenter) and smoothly pan/tilt/zoom the camera to keep that person in the frame, e.g., as they move between the whiteboards and the desk:
ON
just under the words AUTO TRACKING.SWITCH (just under the
ON button) will make the camera attempt to follow the other
person in the frame, but it can get confused.ON button (thereby
turning it back on, hopefully now tracking the new person).Typically the lighting on the presenter’s face is horrible, because
you turn down the room lighting to be able to see the projector, so
there’s almost no light on their face but tons of backlighting from the
projection screen behind them. Two camera settings make this much
better; each has a button on the remote control to toggle:
WDR and BLC.
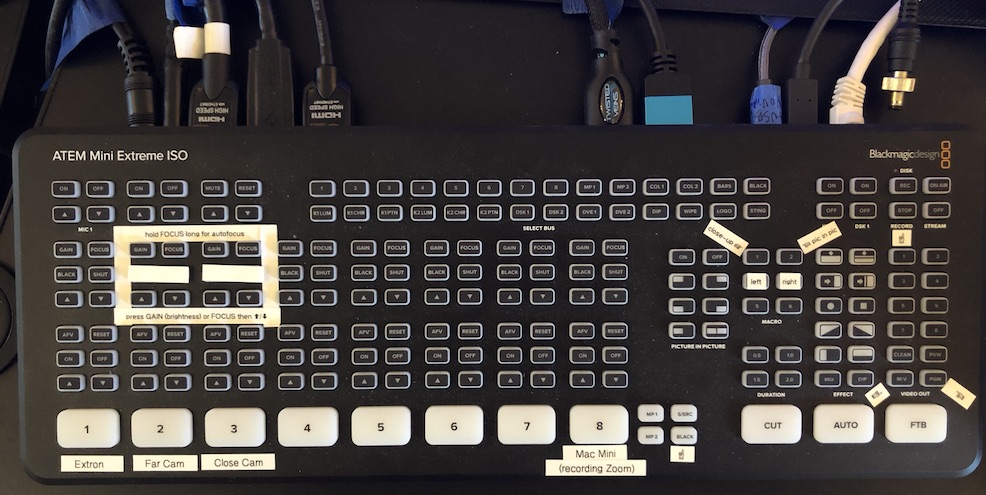
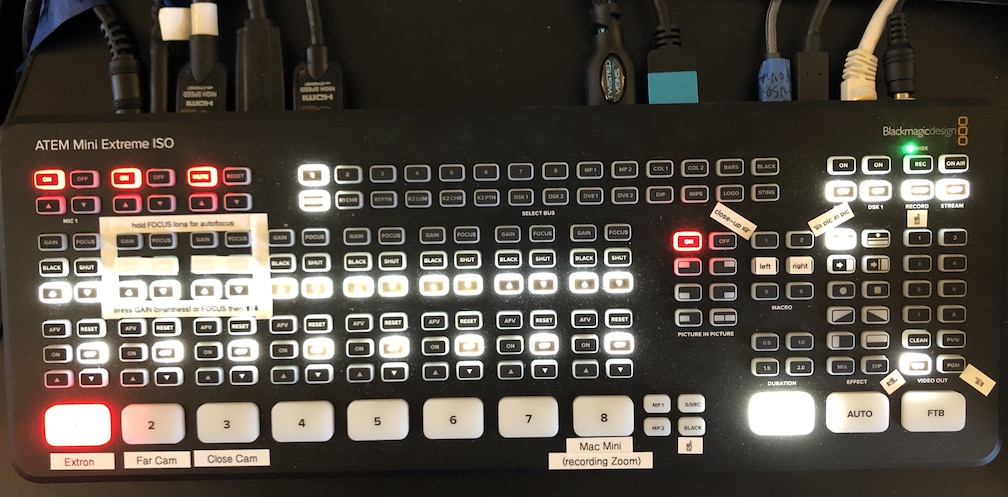
The Blackmagic ATEM video switcher (“Drum Machine”) is the heart of the video production system. There’s a separate documentation page about the ATEM hardware and capabilities in general; here we focus on the CCRMA Classroom, where we use it primarily to select which (combination of) camera view(s) will be the virtual “camera” for software such as Zoom on the connected Mac Mini, e.g., video from your laptop (via the Kramer), with your face superimposed in a small picture-in-picture rectangle, with the HDMI audio from your laptop mixed in with the lavalier and room mics, occasionally switching to an audience view.
HDMI OUT 1.
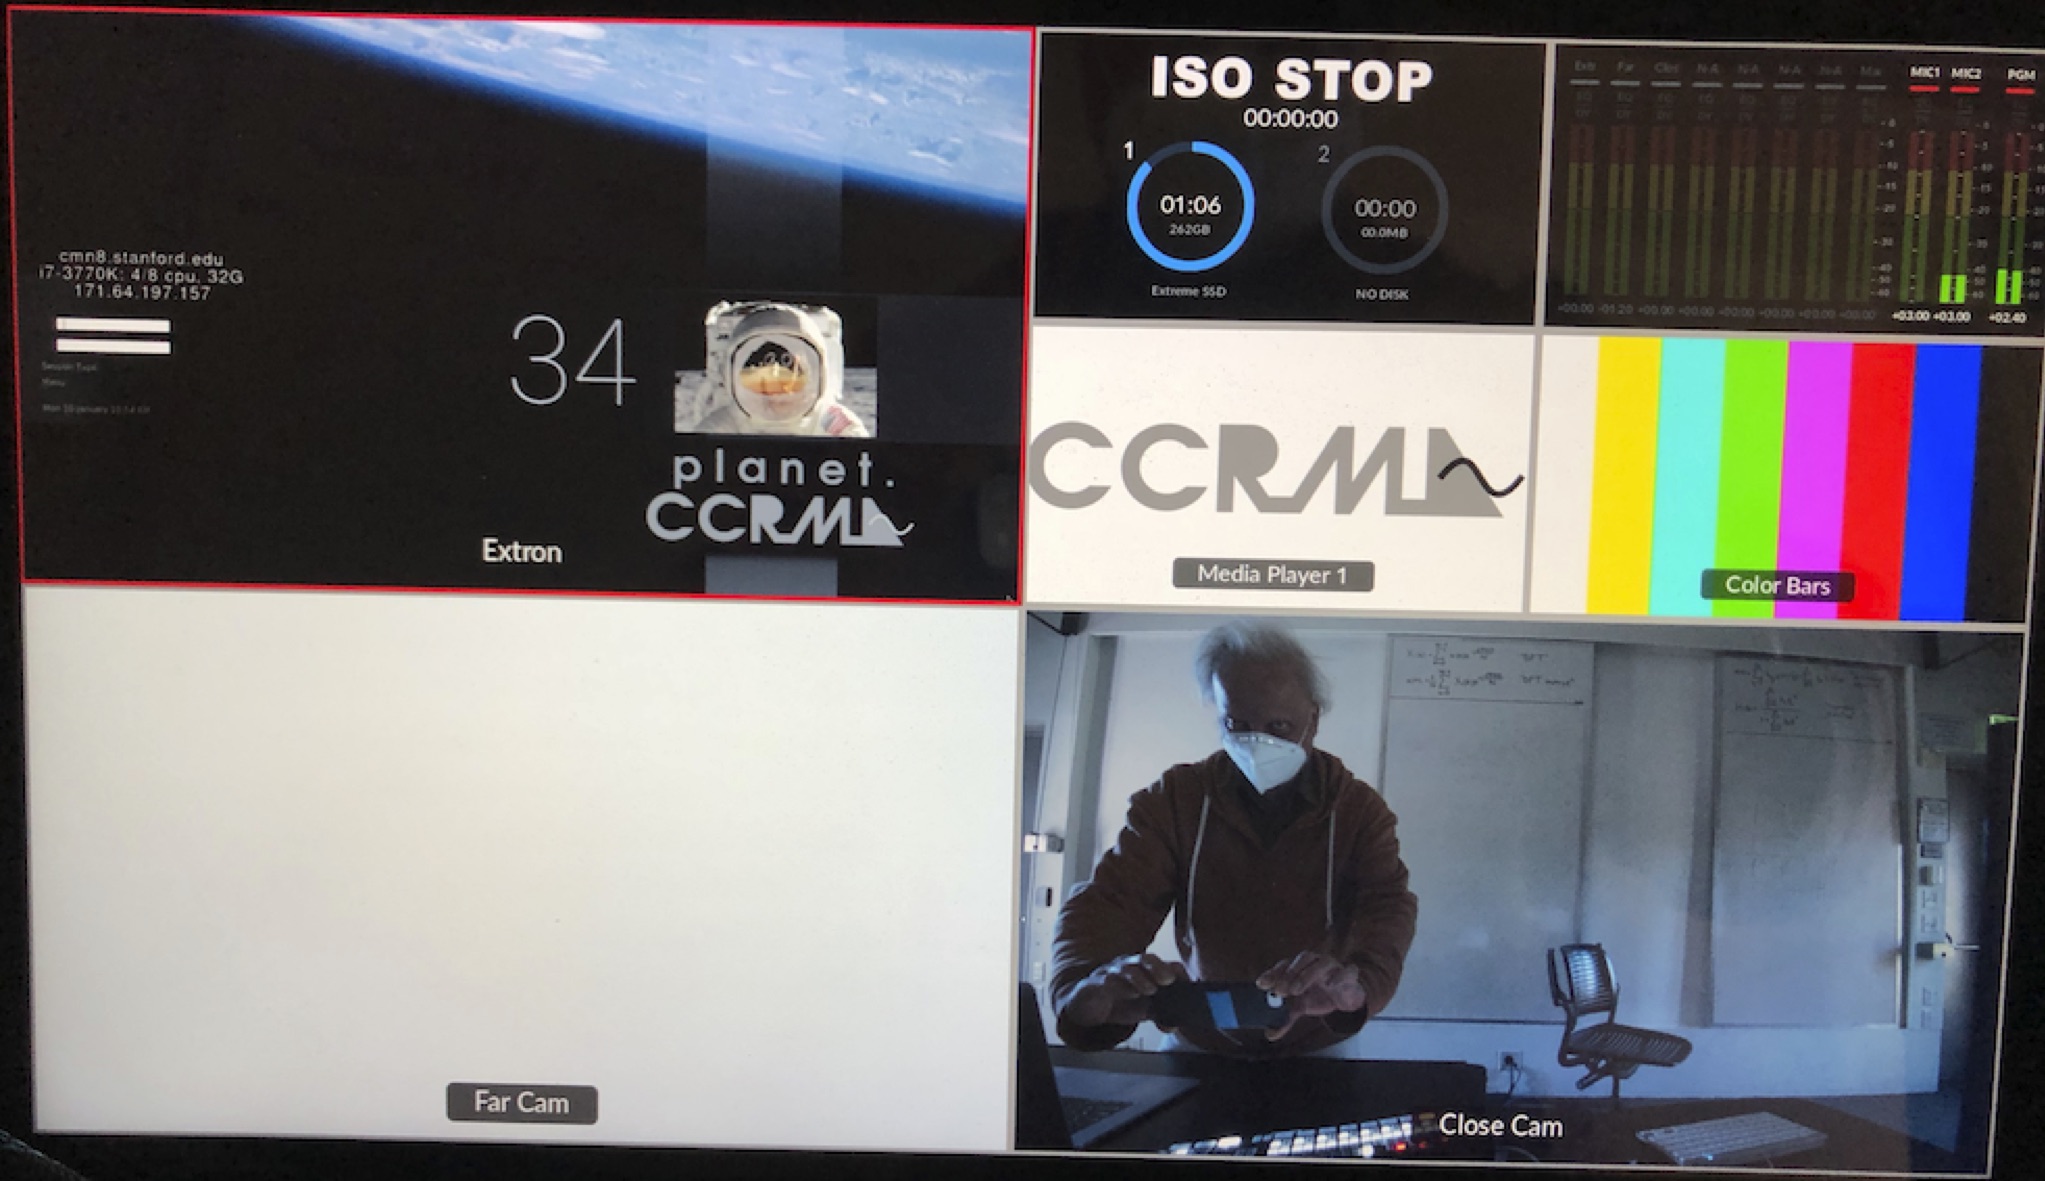
TODO: redo this image with the current 3-camera setup
If the Blackmagic is powered on and its display shows normal operation, but the computer is not receiving the Blackmagic’s “program” output video signal, then try:
There’s nothing too special about this Mac; it’s just for running Zoom (etc.).
Its Keyboard, 17.5” Video display, and Mouse are shared with the Linux machine via a KVM switch just beneath the display (under the label “↓ switch with KVM ↓”).
Its video input “Camera” (with stereo digital audio)
can be Blackmagic Design, aka the “Drum Machine”, so you can video-produce your
class/lecture/concert/etc. for streaming and/or recording, or else just
a traditional Logitech Webcam C925e mounted above the
display.
The KVM’s video output is split (mirrored) to the
KVM input of the Kramer
(so you can show Zoom on the projector) and also optionally to an
audience-facing 24” video monitor (controllable via an ON/OFF switch
labeled “Mirror This Screen to the Audience” located just above the
KVM).
The Mac’s built-in (External Headphones) audio
output goes in analog to the audio
mixer (so you can hear Zoom in the loudspeakers). You could
alternately use “VP-551X”, the Kramer, i.e., sound via HDMI, but then
this sound will go away when you change the projector source.
It doesn’t connect to CCRMA accounts, but you can easily just log in as “A Zoom User” (with certain restrictions, such as all files being deleted when you log out). (Otherwise you need a local account (meaning just for this one computer): ask staff to log in (as admin) and perform Apple’s usual way of making a “User”.)
Here’s one way to have somebody who is not in the room teach a class or make a presentation to a live audience in the Classroom.
KVM on the Kramer. The Zoom Mac mini’s video
should now appear on the projector; if not then debug.External Headphones jack, not via any HDMI or USB audio the
machine might recognize.)If/when the current presenter is local, it’s worth going through everything above, and then just make these few additions:
HDMI Desk), possibly switching the local projection back
and forth between that and the Zoom video via KVM to see
remote people.A CCRMA Linux Workstation cmn43.stanford.edu is accessible from the presenters’ desk.
It shares a small keyboard and video display with the Mac Mini via a KVM switch.
It currently has a Tascam 2x2 like most other CCRMA Linux Workstations, wired (in analog/stereo) to the mixer.
This page of CCRMA documentation last committed on Wed Mar 25 10:58:45 2026 -0700 by Matthew James Wright. Stanford has a page for Digital Accessibility.