CCRMA has an Allen&Heath SQ-5 Mixer in the Stage; this page is about the mixer in
general while the Stage Audio
Mixer section talks about the specifics of how we connected and use
it at the CCRMA Stage.
The Meters screen (with a corresponding dedicated button
under the touchscreen) can meter analog inputs, USB audio inputs, and
output channels. The Real-Time Analyzer (RTA) displays the
time-varying spectrum of a selected source in third-octave bands from 20
Hz to 20 kHz.
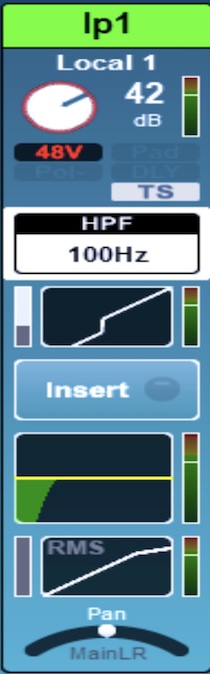
To get in-depth on a single input channel, select the
Processing button under the touchscreen and then select the
channel (by being in the right layer and pressing the channel’s
Sel button); this brings up a sort of channel strip on the
touchscreen that displays preamp settings, metering, compression/gating,
EQ, and pan (figure), which also animates to show that track’s volume,
spectrogram, etc.
The processing channel strip
for an input channel of the SQ-5 mixer.
If you go to adjust the noise gate or compressor, you’ll see the
track’s continuous volume (and how the effect is affecting the
gain).
Pressing the magnitude frequency spectrum display takes you to the
track’s EQ page, which displays the spectrum view where you see the
channel’s realtime spectrogram and the EQ magnitude frequency
responses.
Routing an Input Channel
to FX Sends
A label on the mixer tells you:
Press Sel on the channel
Hold down both “assign” and “CH to all mix” buttons; now the faders
switch to a view of the speakers, with the “Sel” buttons showing where
that input channel is routed to.
With both buttons held down, then press “Sel” on the fx you want to
send to (fx 1 and 2 are long and very-long reverbs, 3 is a tape delay,
and 4 is a doubler)
Then, once you confirm you have sound coming in from your input on
the board, go to Layer B and turn up the fader on the FXReturns for the
FX that you want to hear, and you should be good to go!
If you select the fx channel you are working with and select the
“FX” button, you can go in and edit the actual parameters of the fx, or
you can go to the “FX” button under any input and add effects.
Setting up a Scene
A scene saves the state of the board when you set
the scene (fader positions, sends, fx, etc…)
Click “Scenes” button
To recall a scene, click the name of the scene you are looking for
and then “Go”
To store a scene, set up the mixer how you want it for your
performance, then select an unused # or overwrite an existing scene,
select the # you want, name the file after your performance, and select
“store”
Setting up Digital
Routing Busses (DCA Groups)
Select the channel you want
Hit the “Routing” button
Can select DCA groups or FX sends or which speakers (in which
amount) you want to send to on the touch screen
“DCA Assign” and send to whatever group you want
Now, in Layer E, you can control the fader volume for all of the
channels going to the selected DCA Group
Grouping or “Ganging” Tracks
Select “Setup”
Select “Ganging”
There are group #s 1-8 in the top of the screen. You can create up
to 8 groups. Select the # of the group you want to create.
From here, you can drag and drop available channels (top row) into
your group (bottom row)
If a channel is already in another group, you must first drag it out
of that group into the top row and “Apply” your changes before you can
add it to a new group
The aspects of the channels in the group that will be linked will
appear in white, while those left not linked will be in blue
Once these channels are linked, you will only need to change the
fader/fx/mute/etc of one channel and your changes will apply to all
channels in the group
HOW TO Record Through The
Board
Recording Board Setup
Select “Setup” and “Audio” and change “USB-B” to “SQ-Drive”
Leave sampling rate at 48khz
Recall main scene
Go to “Utility” and “SQ-Drive” and then select either Stereo or
Multitrack on the top banner.
Stereo Recording
To record: First hit the red “record” button to arm recording, then
“play/pause” to start recording, then finally “stop” button to stop
recording.
The recorded file now lives on the USB stick under AHSQ→USBREC and
will have a filename “SQ-ST___.WAV”
To hear the recording played back from the mixer, select “Stereo
Playback” on the same screen and select the filename. The playback will
be output through stereo channels 7-8 (USB-Audio)
Multitrack Recording
By default, will record 32 channels of input (Input Layer A,
Stagebox 1-16). To change this, go to the I/O panel, then Outputs→IP
Direct Outputs, then select output socket “USB” in the top row. Then
patch whichever inputs you need (rows) to one of the 32 available
channels (columns). For most use cases, this is probably not necessary
and you can keep the default I/O routing, i.e. if you are just recording
inputs from the Stagebox
To record: First hit the red “record” button to arm recording, then
“play/pause” to start recording, then finally “stop” button to stop
recording.
The recorded files now live in a folder called “SQ-MT_” the
USB stick under AHSQ→USBMTK and will have 32 individual track files (or
however many you patched for the output) called
“TRK_.WAV”
Playing back the recording from the mixer is more complicated than
for stereo recordings, and requires going to the I/O panel and rerouting
the Input Channels.