CCRMA Documentation links: index contents overview rooms account staff about
(contents of this file: links to each section)
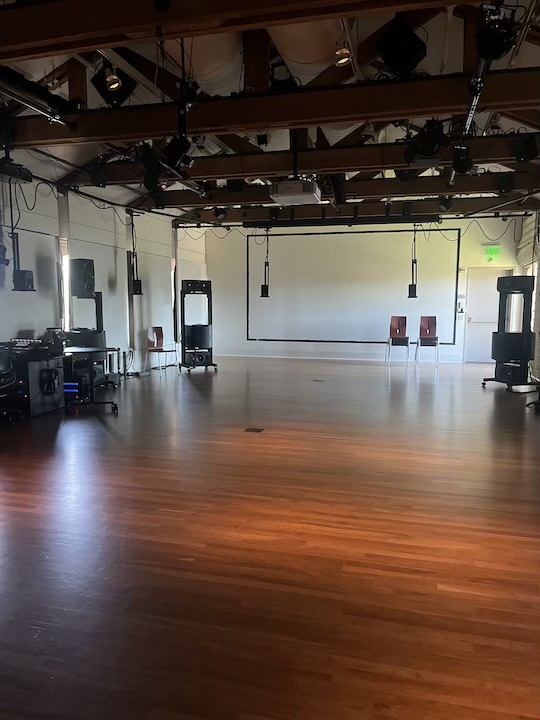
The CCRMA Stage (Knoll 317) is a 100-seat modular concert space and at 7.5m X 16.7m (25 X 55 feet), the largest room in the building. It is our main performance space, largest surround-sound research system, occasional classroom, and typical location for CCRMA concerts, conferences, etc., often busy.
The Stage is equipped with high-quality loudspeakers and a digital mixing console, two computers (Mac Studio and Linux), and two high-resolution video projectors with independent video input switching, supporting two perpendicular performer/audience orientations. A Yamaha Disklavier (DC7 Pro) piano is also available along with a small performance lighting system. The room is acoustically treated with acoustically sealed windows and doors, and adjustable acoustic window coverings. The sophisticated video production system allows live-streaming concerts, recording multi-camera “documentation” footage, and hosting events with both in-person and remote presenters and attendees.
Read more about the room and its sound system: Bringing the GRAIL to the CCRMA Stage (Fernando Lopez-Lezcano and Christopher Jette, LAC 2019).
In this room you should see:
The Stage’s open space is intentionally flexible, with all room contents able to be relocated as necessary (at least within a certain radius of cabling) to accommodate many possible floor plans.
However there are only two main orientations for rows of audience chairs facing a projection screen:
Each orientation has a projector, projection screen(s), and a preset on the mixer with its own version of stereo panning.

Stage users are expected to leave all of the following alone:
If you see any problems with any of the above please contact CCRMA staff.
The Stage houses a 56.8 channel dome loudspeaker system with 56 individual loudspeakers and 8 subwoofers. Sound diffusion can be made directly to all 56 speakers, or a full 3D Ambisonics soundfield of up to 6th order can be rendered through a custom decoder integrated into the system.
The speakers are numbered in groups:
Note that the main speakers (1-8), subwoofers (57-64), and ground-level speakers (49-56) are located in rolling towers containing one of each. Each tower has a home position (with tape on the floor marking where the corners belong) for the calibrated Ambisonics dome, but can also be wheeled and rotated within a large radius as needed for other activities.
| group | num | azi | elev | distance |
|---|---|---|---|---|
| towers 8 | 1 | 27 | 3.9 | 216 |
| 2 | -27 | 3.9 | 216 | |
| 3 | 63 | 8 | 162 | |
| 4 | -63 | 8 | 162 | |
| 5 | 117 | 8 | 162 | |
| 6 | -117 | 8 | 162 | |
| 7 | 153 | 3.9 | 216 | |
| 8 | -153 | 3.9 | 216 | |
| upper 8 | 9 | 23 | 29 | 171 |
| 10 | -23 | 29 | 171 | |
| 11 | 90 | 58 | 109 | |
| 12 | -90 | 58 | 109 | |
| 13 | 157 | 31 | 167 | |
| 14 | -157 | 31 | 167 | |
| 15 | 0 | 70 | 108 | |
| 16 | 180 | 70 | 108 | |
| ring of 12 (rails) | 17 | 9 | 4 | 237 |
| 18 | -9 | 4 | 237 | |
| 19 | 45 | 6 | 187 | |
| 20 | -45 | 6 | 187 | |
| 21 | 81 | 8 | 131 | |
| 22 | -81 | 8 | 131 | |
| 23 | 99 | 8 | 130 | |
| 24 | -99 | 8 | 130 | |
| 25 | 135 | 6 | 185 | |
| 26 | -135 | 6 | 185 | |
| 27 | 171 | 4 | 238 | |
| 28 | -171 | 4 | 238 | |
| ring of 14 (lower trusses) | 29 | 14 | 18 | 243 |
| 30 | -14 | 18 | 243 | |
| 31 | 39 | 22 | 200 | |
| 32 | -39 | 22 | 200 | |
| 33 | 60 | 30 | 154 | |
| 34 | -60 | 30 | 154 | |
| 35 | 90 | 34 | 139 | |
| 36 | -90 | 34 | 139 | |
| 37 | 122 | 30 | 153 | |
| 38 | -122 | 30 | 153 | |
| 39 | 144 | 22 | 201 | |
| 40 | -144 | 22 | 201 | |
| 41 | 166 | 19 | 243 | |
| 42 | -166 | 19 | 243 | |
| ring of 6 (upper trusses) | 43 | 0 | 31 | 180 |
| 44 | 39 | 47 | 128 | |
| 45 | -39 | 47 | 128 | |
| 46 | 146 | 47 | 129 | |
| 47 | -146 | 47 | 129 | |
| 48 | 180 | 33 | 180 | |
| lower ring of 8 in towers | 49 | 27 | -10 | 216 |
| 50 | -27 | -10 | 216 | |
| 51 | 63 | -14 | 162 | |
| 52 | -63 | -14 | 162 | |
| 53 | 117 | -14 | 162 | |
| 54 | -117 | -14 | 162 | |
| 55 | 153 | -10 | 216 | |
| 56 | -153 | -10 | 216 |
An “OpenMixer” dedicated appliance Linux machine can mediate access to the Stage’s loudspeakers.
A touchscreen lets you switch between the two ways to access the loudspeakers:
Digital Mixer, in which the Allen & Heath SQ-5
hardware mixing board can output to only the
first 16 loudspeakers. The mixer’s first 8 outputs go through hardware
crossover filters (around 80 Hz), each becoming a 1.1 signal with treble
sent to a main speaker and bass going to the subwooder in the same
rolling tower. This mode completely bypasses the OpenMixer Linux
machine.Open Mixer, in which all signals going to loudspeakers
first come from a computer (or at least a MOTU), then go through the
separate OpenMixer computer, and from there to the loudspeakers and
subwoofers. OpenMixer software handles routing, main volume control,
“room correction” calibration (making the speakers more flat and more
similar to each other), bass management (separating the bass frequencies
with crossover filters, then panning the bass among the 8 subwoofers
independently of how the treble is panned to the 56 loudspeakers), and
optional Ambisonics decoding.Digital Mixer mode is generally easier to operate, especially for stereo (like for most classes or lectures and a large fraction of concerts); Open Mixer mode is more powerful and flexible (if you know what you’re doing on the software end).
Users operate the Stage OpenMixer via a touchscreen that controls all settings:
Within Open Mixer there are many more settings.
Are the loudspeakers powered on? Are you using the proper settings on the touchscreen?
If using the SQ-5, do the meters show signal on the input tracks you’re trying to use? The output channels? Try troubleshooting the mixer.
If using OpenMixer, does the computer see the MOTU, and is the proper MOTU selected as OpenMixer’s audio source?
Try switching between “OpenMixer” and “Digital Mixer” then back to the setting you want: select the option on the bigger of the two Digital/Open Mixer screens. If that doesn’t work, select “Restart Audio” to reset the system.
Try changing the sample rate away from and then back to what you want. (You should almost always use 48kHz.)
Try resetting the MOTU you’re trying to connect your laptop to (either “reboot” from their web interface or simply power it off and back on).
If the touchscreen(s) is/are nonresponsive, and/or if you’re trying to use OpenMixer but OpenMixer isn’t working, try rebooting or power cycling the OpenMixer Linux machine.
The hardware digital mixer is an Allen&Heath SQ-5; we have a separate documentation page about the mixer itself
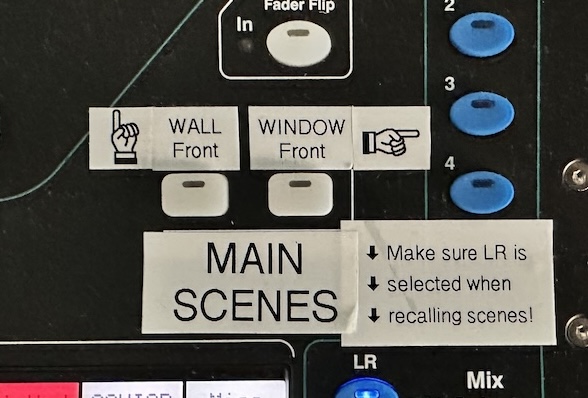
The mixer can store various settings in “scenes” (presets). The top center of the screen (just beneath their printed logo) displays the “current” and “next” scene. There are two “MAIN SCENES” corresponding to the two audience orientations, each with its own dedicated labeled button towards the right of the mixer. Clicking one of these scenes should bring all mixer state back to normal (including bringing all faders all the way down); usually this is the best first step:
Wall front: stereo goes first to speakers 1&2, then
later (delay compensated) to side/rear stereo pairs. Also the overhead
ceiling pairs are 5-6 dB quieter than the ones on the towers and
similarly delay-compensated.Window front: Same thing but in the other orientation:
first 4&6, etc.More complex scenes have dedicated buttons on the left side of the mixer
WALL Front)USB/Linux/Mac: 16 channels each from a laptop
(connected via USB to the mixer), the Linux
machine, and the Mac Studio (instead of
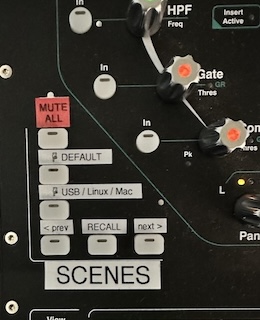
the various default stereo sources).You can save your own scenes (aka presets) but you can’t overwrite the default presets. Above the big “SCENES” label are prev/next/recall buttons for scrolling through scenes and choosing one.
To reset the mixer: just select either main default scene.
The inputs/channels/tracks/faders are labeled with an LCD strip; the
labels change automatically as you select layers (the buttons in the
lower left labeled A through F that select
groups of 16 channels for the faders etc. to control) or presets.
On the main page, most channels are paired/ganged in stereo pairs; move only one and the other will follow. (If you move multiple at the same time, your fingers will feel that they’re “fighting” the motors.)
The main and default scenes use the following channel assignments.
Layer A:
1/8” DI Box: DI box with ⅛” stereo TRS input (like for
a headphone jack); has ground lift. Used to be the main default way of
connecting; still popular with laptops.Mini Plug: Shorter ⅛” stereo TRS going directly into
the mixerBluetooth: device “BT PRO V2”; password is 1246 - pair
your phone or laptopUSB Audio: a labeled black 15-foot USB cable that you
can connect to your laptop to select the mixer itself (named
SQ5 or SQ audio) as your USB audio interface.
USB Audio of input layer
A.USB / Linux / Mac scene, where they appear as channels 1-16
of input layer A (instead of all the mono and stereo
sources in this list)I/O button under the
touchscreen, USB on the top, and Inputs /
Input Channel on the leftHDMI Wall: the stereo audio extracted from the HDMI source selected for the “wall”
projector.HDMI Window : the stereo audio extracted from the HDMI source selected for the “window”
projector.WirLav: Wireless lavalier microphone stored in the
“Mics” drawer below the mixer (along with its rechargeable batteries).
Device has a single button: a long hold toggles power on/off; a short
tap toggles mute/unmute. Defaults to NOT being routed to any speaker;
you must route this input channel to whichever speaker(s) you
desire.WirHnd: Wireless Handheld microphone (stored in second
drawer under mixer): same as WirLav except the single button is on the
bottom and the mic unscrews in the middle to access batteries.Anlg7 / Anlg8: two open XLR inputs
physically on the back of the mixer (no weird routing to stage boxes,
etc - just a simple way to plug two mics straight into the mixer). Use
the dedicated “Preamp gain” knob (or the touch screen after hitting the
“processing” button). Extra mics (SM57, SM58, Core Audio condensers) are
in the black drawer labeled “Mics” to the left of the computersLayer B: Patchbay (line inputs labeled “patchbay” in back of the mixer)
Layer C: Stage Box (DX168 Allen and Heath Audio Rack near the wall projection screen) and internal effects returns
In all the default scenes (presets), many inputs (for example mics that might be plugged into the Stage Box) are intentionally not routed to speakers (to avoid feedback, and because we don’t know how you want them spatialized).
A label on the mixer attempts to give you these instructions to route an input channel to speakers:
Effects sends (to the internal effects such as reverb) work exactly the same.
Missing sound from the SQ5? Here are some things to note/try:
LR and choose the appropriate mixer sceneIt’s a rolling rack that “looks like a little robot” (perhaps an MSE-6 from Star Wars), on a long “umbilical” cable (enough to be able to move anywhere in the room). It contains equipment intended to connect to a visiting laptop for a concert performance or lecture presentation

The Stage’s “Desktop” station is a rolling cart containing a 27” Dell “UltraSharp” 4k video monitor, QWERTY keyboard, and mouse, switchable among CCRMA’s Linux and Mac Studio workstations via three (!) KVM switches:
This flexibility (with each computer potentially seeing two video outputs) lets you do things like show the Zoom gallery view on the “window” projector while the audience is mainly facing the screen-shared presentation content on the “wall” projector.

Each station has an associated KVM switch. Both KVM switches are located on the desktop cart even though one of them controls the K, V, and M of the video cart (because both source computers are on the desktop cart). The three possible computer sources are:

The HDMI outputs of these two switches, i.e., the video from the selected computers are split into a tiny HDMI switch that chooses which of the two video signals will go into the projector source selector. In other words, you can easily project whatever you’re showing on either video monitor. Additionally, the selected HDMI source for the desktop cart is also mirrored into the KVM switch in the Seminar Room.
The Mac Studio has an account “Stage user”
Blackmagic Design, along with its “microphone”
8A-MAC is the MOTU that connects to the audio system. USB PnP Audio device
refers to the headphones on the Desktop Cart; (Don’t choose
PA32UCR, that’s the video monitor, which has no speakers.)
A CCRMA Linux Workstation cmn35.stanford.edu is selectable at the Desktop cart.
It has a MOTU 16A audio interface. Beware that Linux doesn’t always successfully talk to the MOTU the first time you try so you might need to “play” or “start audio” a few times.
Also beware that by default the operating system will often perform an automatic 7.1 surround mix that you probably don’t want.
The best way for Linux software to access multiple audio channels is JACK, avoiding these and other problems. (JACK may not start the first time, but after it does start, all other software going through JACK can connect reliably to the MOTU.)
Linux video can’t go to projectors.
By each door is a panel for lights. Click (almost) any button and you’ll get some light in the space, at least enough to be able to read the labels for each button/preset. But to control lights fully from the lighting station you need to “start with a blank slate”; you must operate both lighting control panels to get a complete blackout. The instructions written on the lighting panels say exactly what to do:
The overhead pipes hold a decent collection of mainly LED-based controllable stage lighting. Two are on motorized pan/tilt arms allowing you to control the positions (manually or programming cues) from the lighting board. To aim the rest, we typically use a tall 4-step stepstool or a short ladder to climb up to be able to reach the fixture. We typically control on/off, color, and intensity via DMX from the lighting station.
ColorSource AV (Lighting board)
Lighting Board faders/channels
Top row: LED “par” lights with programmable color and gain
Bottom row: other lights and related
More faders: “Master” like main gain - have all the way up
There’s an ethernet port on the back where you can send DMX over OSC. Also we have a DMX controller that connects to your laptop over USB.
From the lighting board:
Hit “record” then choose a cue number (e.g., 300, 301)
Upper right corner shows the current cue and the next cue. Buttons under the touchscreen let you go back and forth between two presets
Strobe effect is possible
Can also set the dimmer curve
The entire “window” side of the room is indeed full of south-facing windows that can bring in lots of daylight. Often events instead favor video projection by closing the curtains.
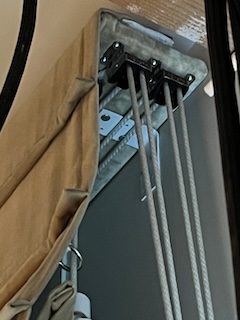
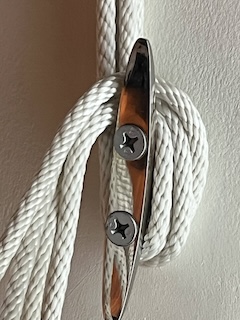
Each curtain has a rope hanging down via a pulley system (per photo). Pulling down on the rope with enough force will lift the somewhat heavy curtain; letting go allows gravity to pull the curtain back down (and hopefully not give your hand a rope burn). Each rope has an associated wall anchor, somewhat reminiscent of a “cleat” on a sailboat), where you can easily “tie off” the rope to keep the curtain lifted (then later untie to let the curtain back down).
Unfortunately, although the curtains block most light, they don’t fit perfectly, leaving a small gap around the edge of each window. CCRMA Staff are working on a more complete blackout solution.
Each audience orientation has a video projector and one or two projection screens:
“Window”: Optoma UHZ65 (with the smaller remote control) illuminating a motorized projection screen (109 x 61 inches).
“Wall”: Epson Pro L1300U (manufacturer’s page. This can project onto either of two screens:
The glass “cookie” jar next to the mixing board contains handheld remote controls for each projector as well as another that operates both motorized projection screens, along with HDMI dongles etc. The selector under the mixing board lets you independently set the source for each projector.
Partial instructions for toggling the “wall” projector between the
two possible screens (since they require different lens and geometry
correction settings) using the projector’s handheld remote, indented
according to the tree hierarchy of the projector’s menu system (where
the Menu button goes deeper and Esc comes back
up):
memory
    lens position
        load memory
            choose "wall" or "drop-down"
    geometry
        load memory
choose "wall" or "drop-down"The video signals to the two projectors are determined by the Kramer VS62HA (manufacturer’s page) 6x2 video switching matrix.

The Kramer’s two outputs go to the two projectors:
The Kramer’s 6 inputs are the 6 possible video sources (three of
which are smaller pairs of possible video sources, giving nine total but
less generality than a full 9x2 matrix), mostly located on the
INPUTS panel along with controls for the smaller source
switches:
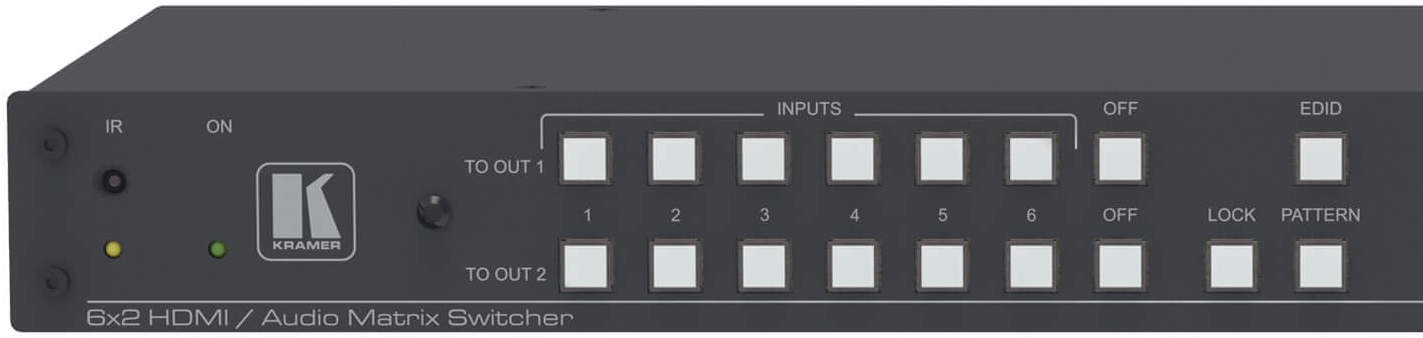
This Kramer’s front-panel user interface allows you to choose which of the six inputs goes to each of the two outputs. The two rows, labeled “TO OUT 1” and “TO OUT 2”, represent the two projector outputs. The six columns, labeled “INPUTS” “1” through “6”, represent the 6 possible sources. Press any button to set the corresponding output to receive the corresponding input. The “OFF” buttons send black. It’s OK for both projectors to mirror the same one input source. Don’t press any other buttons.
Whatever you select on the wall projector, the stereo audio embedded
in the HDMI stream comes into the mixer as HDMI Wall;
likewise the audio from whatever HDMI is selected on the window
projector comes into the mixer as HDMI Window. This
typically appears to your computer as the audio device “HDMI
Splitter”.
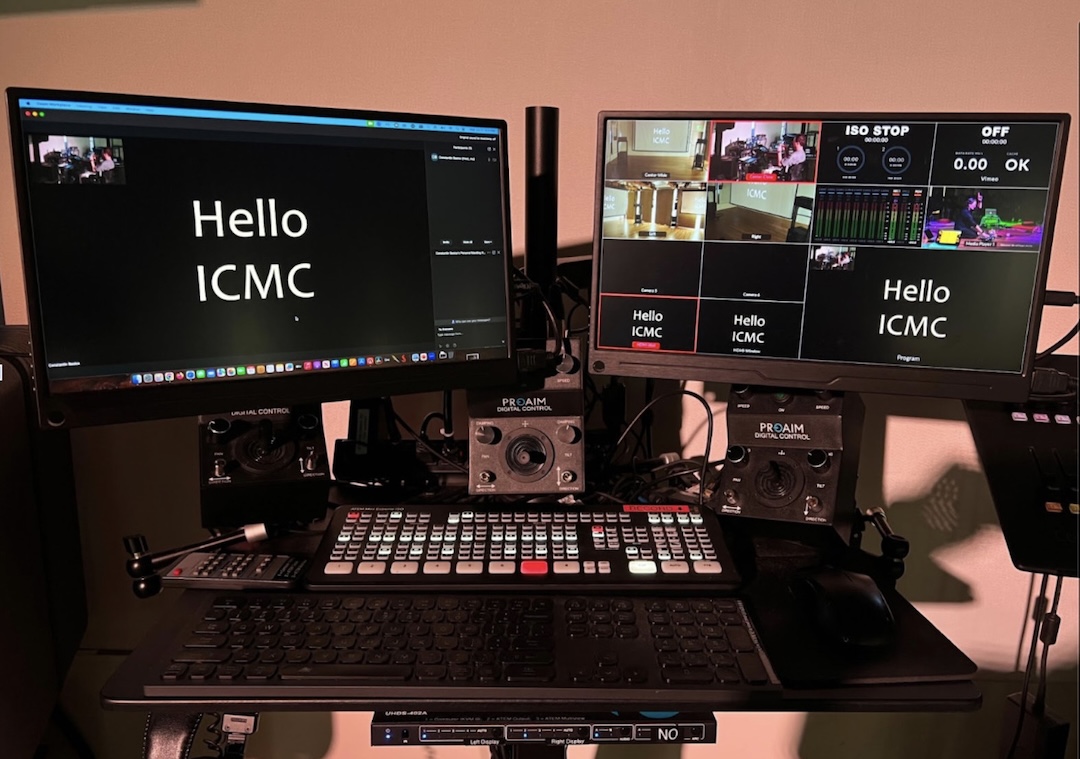
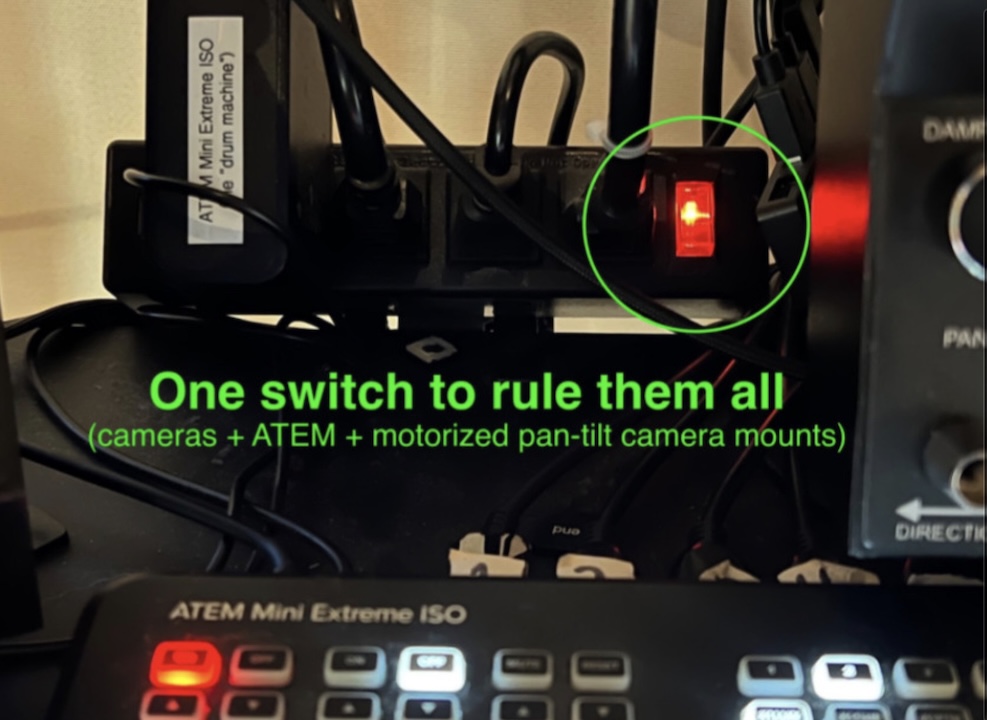
The video production and livestreaming system is located on a rolling cart near the mixing board, between the lighting board and the desktop station. A Blackmagic ATEM video switcher (same as in the [Classroom]) switches (or combines from) up to 8 HDMI sources (including mirrors of the projector images); the resulting video signal can be the Mac Studio’s realtime “webcam” (e.g., for Zoom), or streamed directly from the ATEM’s ethernet jack to Vimeo. One power switch controls the ATEM, the ATEM’s video display, and multiple cameras.
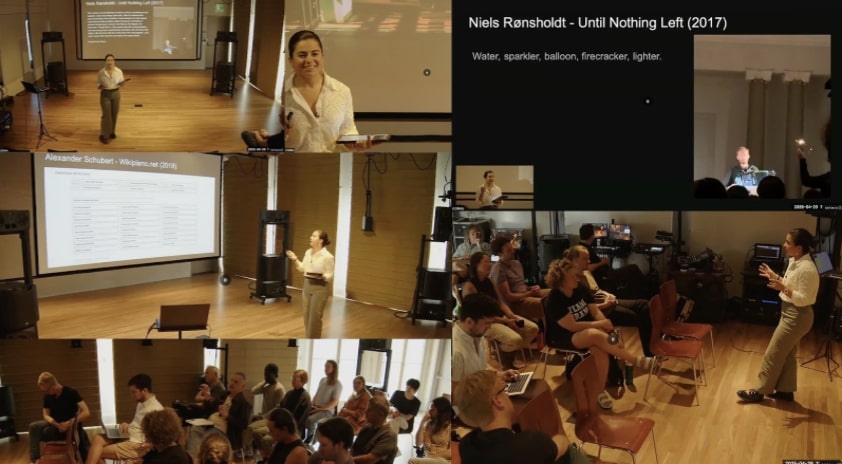
There are four Blackmagic Design Pocket Cinema Camera 4K (manufacturer’s page) video cameras securely mounted from the ceiling:
Cameras are controlled from the desktop application ATEM Software
Control (e.g., running on the Mac Studio), from the
Camera tab at the bottom, including aperture, shutter
speed, gain, color temperature, and motorized lens zoom. Increasing a
camera’s gain increases brightness but also noise; 10 dB is usually
good. The Mac desktop contains two annotated screen grab images showing
recommended “ATEM/Camera Default Settings”.
Focus: if you hold the button the camera will auto-focus. If you click and then quickly (while the focus button is still green) use the up/down buttons, you can manually focus.
You sometimes have to power them on by pressing the button on the device twice.
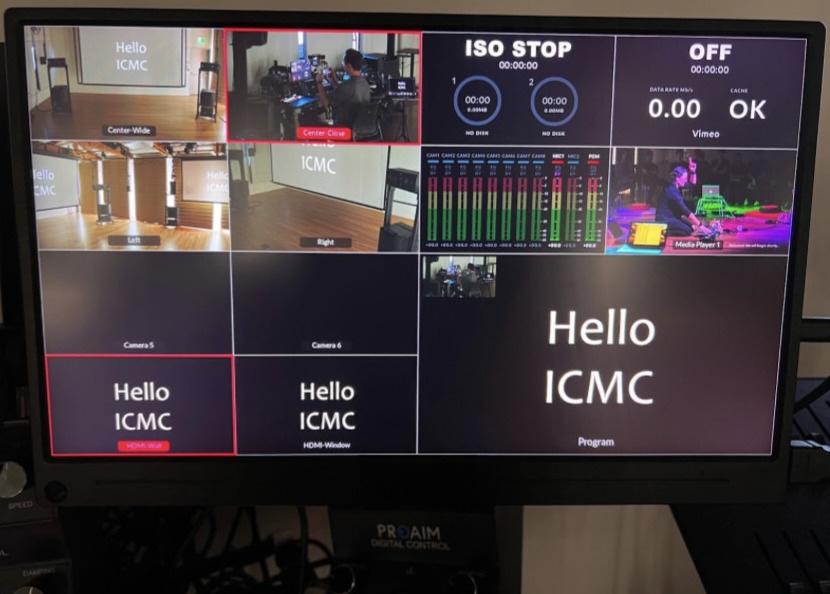
The center of the video station is a Blackmagic ATEM Mini Extreme ISO video switcher whose “program” (what’s currently selected) goes out to livestream or video meeting.
Inputs 1-4 are cameras 1-4 above. We usually reserve 5 and 6 for “one-off” additional cameras or other video sources. The last two inputs mirror the video selected for the two projectors:
The three joysticks above the ATEM control pan and tilt for cameras 1, 2, and 4. (By standing up you can reach camera 3 directly.)
The two small video monitors show the two independent outputs of the Orei UHDS-402A 4x2 HDMI matrix switcher mounted just below the table surface:
The keyboard and mouse connect to KVM B (typically the Mac, e.g., to remote-control camera settings via the ATEM Software Control Application).
It’s 32-bit recording
Two synced Zoom F8N Pro 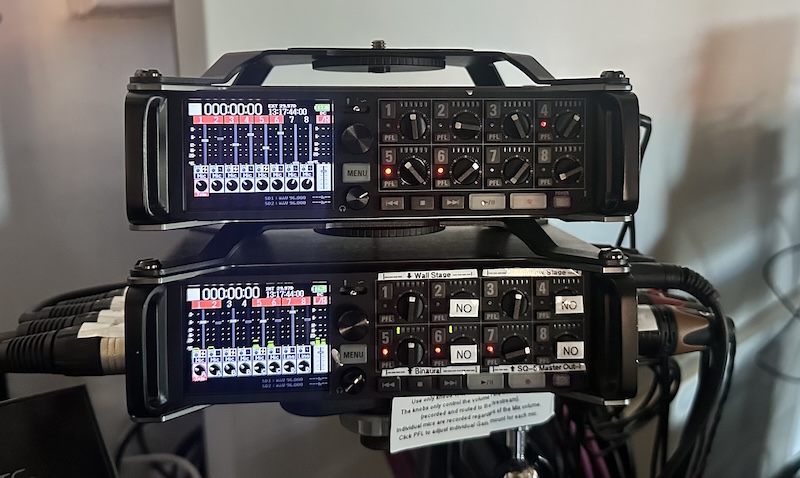
Input:
1-2: binaural mic in center
3-4: stereo pair near wall stage area
5-6: stereo pair near window stage area
7-8: Mixer’s stereo outputs (which are not used for anything else)
It records the input and also makes a mix of these four stereo sources to be the stereo input sent to ATEM’s “Mic 1” input (to Zoom or the livestream).
If you click the PFL button then the knob sets the input trim. But by default they’re the gains in the stereo mix that is the audio output.
Easy stereo: Headphone jack to LTI-1 to SQ5 mic inputs 1+2.
Easy stereo from video: HDMI from laptop to Kramer, select that source for either (or both) projectors, use SQ5 Layer A “HDMI wall” or “HDMI window”
More flexible: USB into SQ5, route up to 32 channels in “INPUTS” layer
Most Flexible: MOTU USB to OpenMixer
Plug in HDMI to one of many numbered ports. Choose that HDMI as the source for the desired projector(s).
We have the specialty laptop stands along with a selection of small tables suitable for a laptop plus a bit more stuff.
Recipe: https://vimeo.com/blog/post/stream-without-the-stress
Log into Vimeo (as someone connected to CCRMA’s Vimeo account)
Choose “Live events” from main menu (under “Home”)
Event will have a URL like https://vimeo.com/live/rtmp/event/9999999#stream
If you want to update https://ccrma.stanford.edu/live to be the portal (as usual) for this event, then from this Vimeo event page click “Embed” to get some HTML code for embedding the livestream player, suitable for pasting into /usr/ccrma/web/html/live/index.html
Make sure “Stream” is selected in the main menu.
Copy the “stream key”: it will be 32 hexadecimal digits (0-f) with four
dashes inside (8-4-4-4-12).
Leave this window open (to preview the stream and then “go live”).
Connect to the ATEM switcher using ATEM Software Control.app from a connected Mac (either via wired USB-C or via Ethernet if network settings allow) such as the Stage or Classroom Macs.
Paste the stream key in the right place
Clicking the ATEM’s “On Air” button (near upper right) puts the event in
preview mode; back in the Vimeo window (where you’re logged in), you
should be able to preview at least video (if not also audio?!?)
If it looks OK then from the event’s Vimeo page you can click “Go Live”.
Now the world can stream it.
All this video switching and splitting happens via a somewhat ridiculous collection of little boxes, crammed into some wire shelves in the rear of the rack underneath the mixer.
Requirements:
Anything going to either projector should be mirrored into an input of the Atem video switcher (e.g., so a concert live stream can switch to a direct full screen display of the material being video projected).
Therefore we already have to run (two) long HDMI from the mixer cart (where the Kramer originates the signal going to each laptop) to the video cart, so we might as well use that HDMI cable to carry digitally the stereo audio that will go out on the live stream.
Gadgetry:
Kramer out 1 goes into an OREI UHDS-102 (18G) HDMI splitter. Output 1 of that goes to the “wall” projector (via a Kramer TP-580T HDMI-to-HDBaseT converter); Output 2 goes to a Sescom SESAI1001 Audio Inserter, which inserts the analog stereo sound mix from the Zoom H6 as the audio to accompany the video signal on the HDMI cable. But this HDMI signal is somehow incompatible with the Atem (perhaps in terms of resolution or color space), so we use an OREI HDS-102 (less than 18G) splitter, not for HDMI splitting (with only one output plugged in), but as a converter that somehow makes the HDMI signal palatable to the Atem.
Kramer out 2 is the same but without the audio inserter: It goes into another UHDS-102 (18G) HDMI splitter, whose first output goes to the “window” projector (via another Kramer TP-580T) and whose second output goes to another OREI HDS-102 (less than 18G) used as an Atem-compatibility converter and not for splitting.
The Stage has a Yamaha DC7 Pro Disklavier player piano.
Piano tuning can be arranged prior to a performance at the requester’s expense.
HDMI Window and HDMI Wall mixer inputs.Relatively easy stereo:
Digital Mixer1/8” DI Box) if you plugged in via
1/8” auxHDMI Wall) to use audio from the
HDMI showing on the “wall” projection screenHDMI Window) to use audio from
the HDMI showing on the “window” projection screenOR
Full access: 2 USB MOTUs on the “droid” cart connect to
Open Mixer
Plug your laptop into audio and video as above.
Next to the mixer is mounted a small Zoom H6 that mixes and can record stereo sources from room overhead mics and the mixer’s stereo outputs (which go only here, not to any physical loudspeakers). If this is on you should see one pair of meters for each stereo source, including the overhead mics which go straight into the H6 (not through the mixer, because you’d never want to route them directly to speakers). On the mixer route to “stereo” anything you want to go out to Zoom like your laptop sound, lav mic, handheld mic, etc.
The video station contains a “drum machine” with its own display, like in the Classroom, for switching “cameras” in real time. The last two of these are (supposed to be) mirrors of what go to the two projectors. The stereo sound from the Zoom H6 becomes the audio accompanying the pixels mirroring the projector on the switcher’s HDMI input #7. You can use the “M/V” view to see which inputs are which cameras and how they’re all angled. Two built-in cameras are on motorized pan/tilt units with joysticks at the video station.
The Mac Studio on the desktop station can run Zoom, like the Classroom’s mac mini; its “webcam” is the Blackmagic ATEM (“drum machine”), suitable both for Zoom’s “Camera” and Zoom’s “Microphone”.
The easiest way to hear people on Zoom (especially if you also want
to see them on a projector) is to set Zoom’s “Speaker” to
PA32UCR (namely the video monitor, i.e., HDMI audio) so
Zoom sound will come into the mixer via HDMI audio extraction.
If something doesn’t work or was left in a bad state, contact Constantin, Fernando, Kimia, and/or Matt
This page of CCRMA documentation last committed on Mon May 25 15:55:50 2026 -0700 by Matthew James Wright. Stanford has a page for Digital Accessibility.